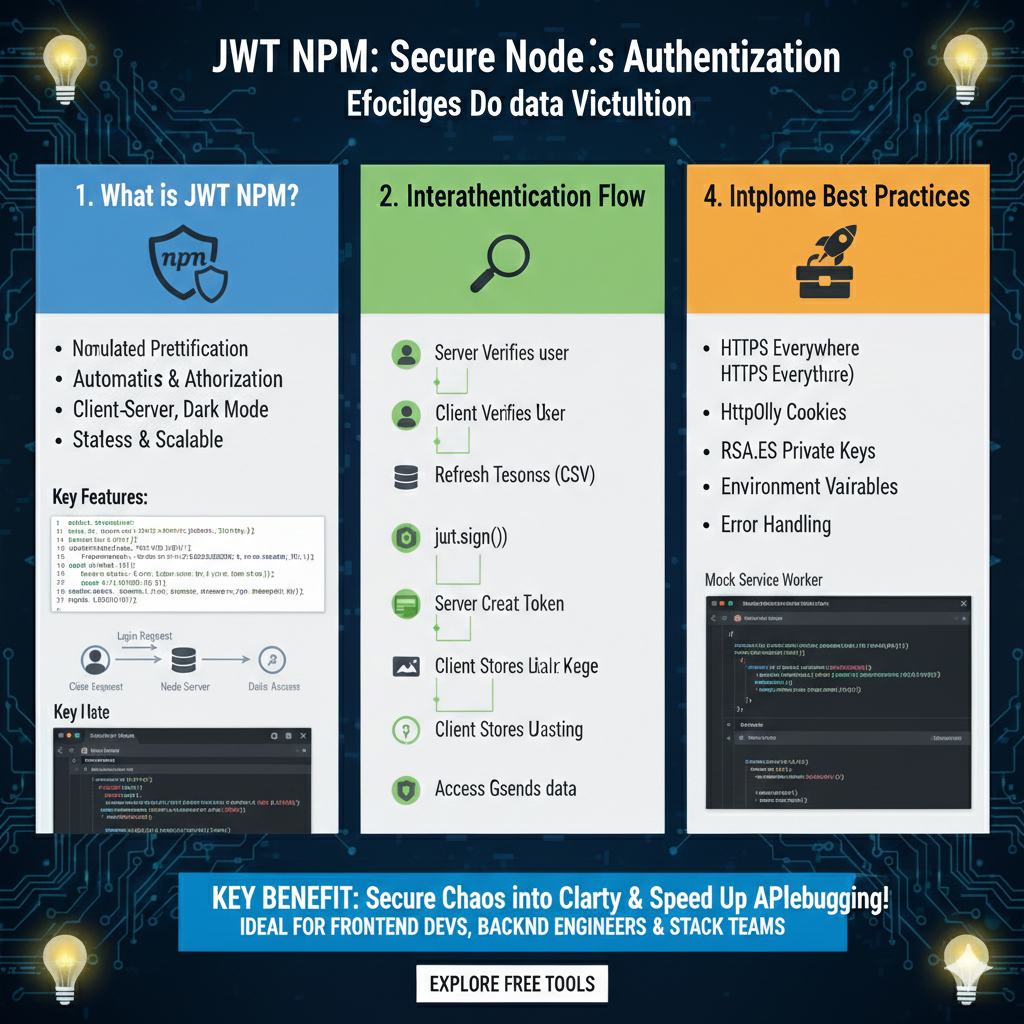
In the world of modern security, jwts for java apps have become the gold standard for securely transmitting information between parties. A json web token (jwt) is a compact, URL-safe means of representing claims, and it is widely used for token authentication and information exchange.
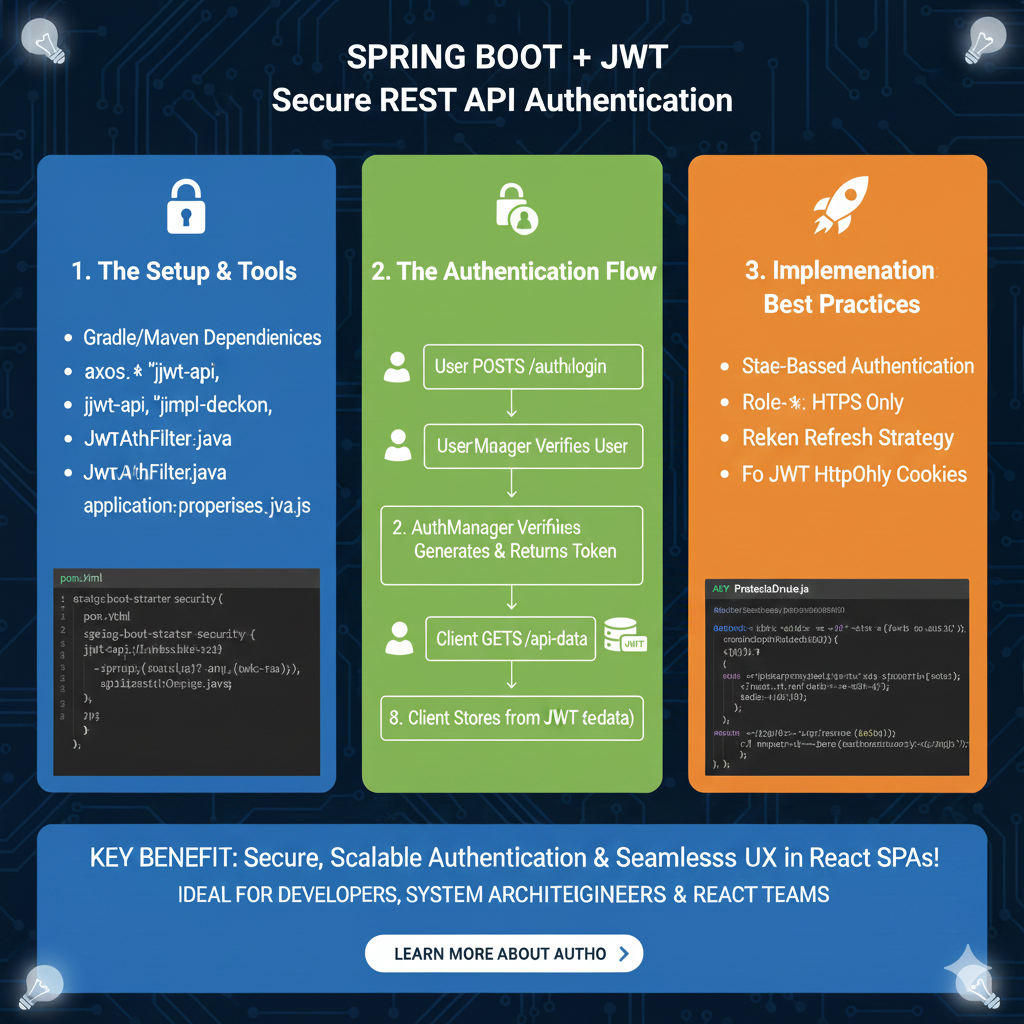
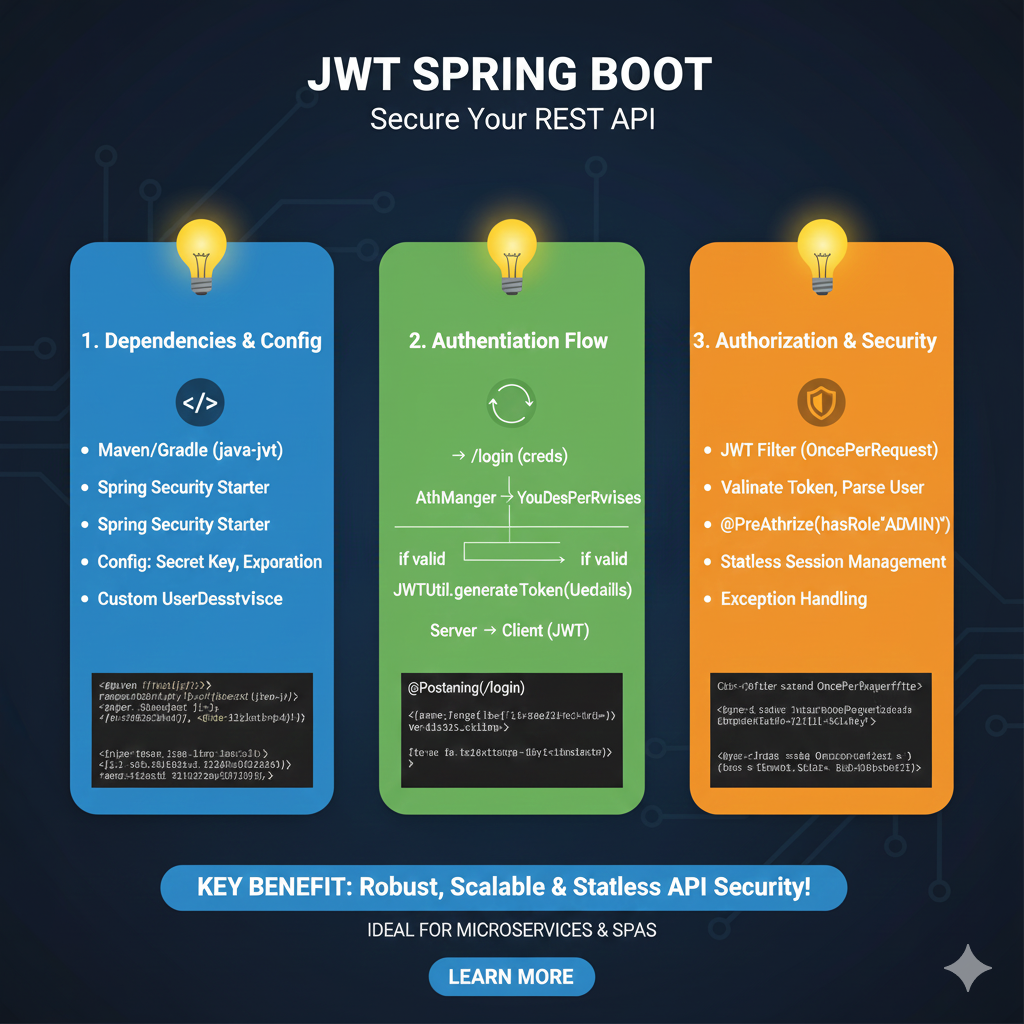
In java development, especially when working with spring boot or google Cloud APIs, jwts provide a robust solution for stateless authentication. This allows your server to verify jwts without needing to store session info in a database.
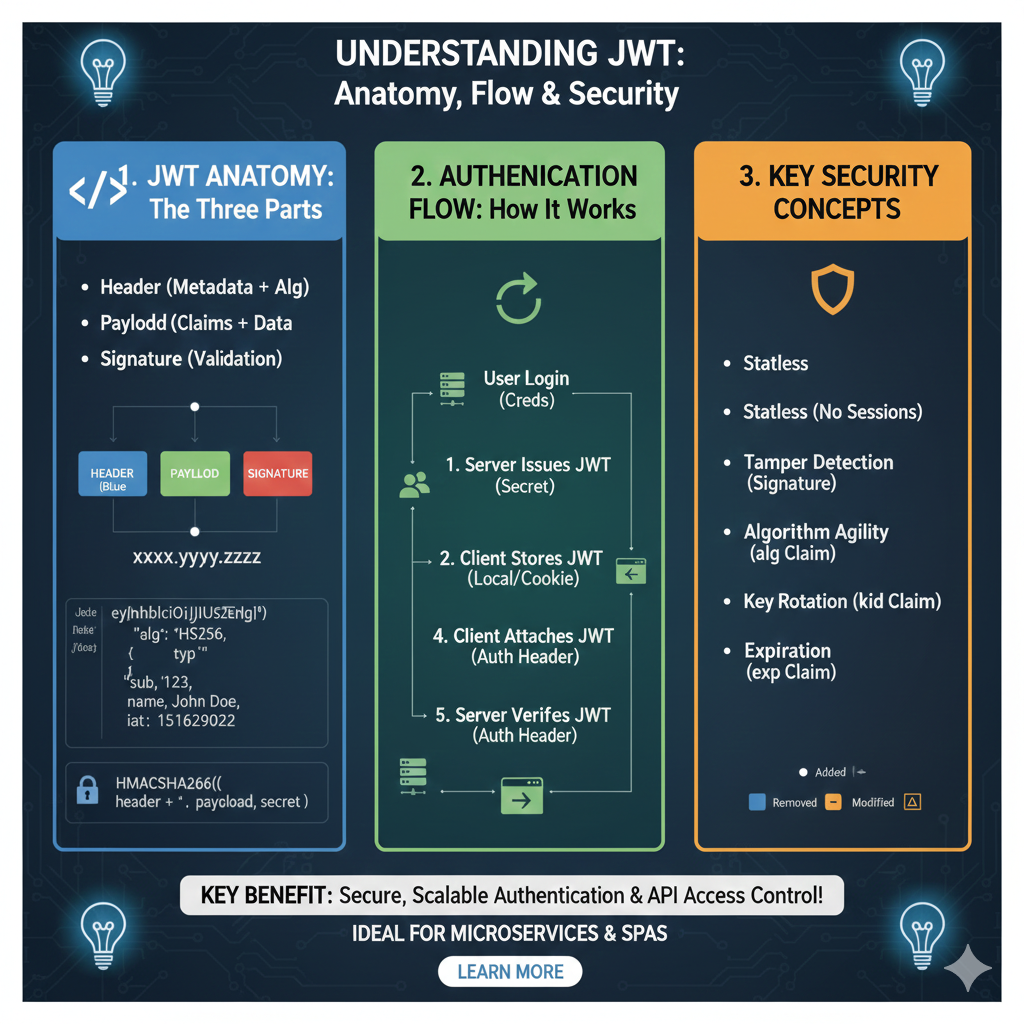
Understanding the jwt token Structure
A jwt consists of three parts separated by dots (.):
- Header: Defines the algorithm (like HS256) and the token type.
- Payload: Contains the claims—the core data like user IDs or roles.
- Signature: Used to verify jwts and ensure the tokens haven’t been tampered with.
How to Implement java jwt using jwt libraries
The jjwt library is one of the most popular jwt libraries for java. It simplifies the jwt create and decode process.
Step 1: Add jjwt Dependency for token authentication
To start using jwt java features, import java dependencies into your pom.xml.
XML
<dependency>
    <groupId>io.jsonwebtoken</groupId>
    <artifactId>jjwt-api</artifactId>
    <version>0.11.5</version>
</dependency>
<dependency>
    <groupId>io.jsonwebtoken</groupId>
    <artifactId>jjwt-impl</artifactId>
    <version>0.11.5</version>
    <scope>runtime</scope>
</dependency>
Step 2: Generate a Secret Key class
For any jwt sign operation, you need a secure string key.
Java
import io.jsonwebtoken.SignatureAlgorithm;
import io.jsonwebtoken.security.Keys;
import java.security.Key;

public class JwtUtil {
    private static final Key SECRET_KEY = Keys.secretKeyFor(SignatureAlgorithm.HS256);
    public static Key getSecretKey() { return SECRET_KEY; }
}
jwt java Implementation: jwt create and jwt sign
To generate a jwt token, you will use a method that defines the claims and applies a signature.
Step 3: Creating a json web tokens method
Here is how you perform a jwt sign to produce a secure token.
Java
import io.jsonwebtoken.Jwts;
import java.util.Date;

public class JwtGenerator {
    public String generateToken(String username) {
        return Jwts.builder()
                .setSubject(username)
                .setIssuedAt(new Date())
                .signWith(JwtUtil.getSecretKey()) // jwt sign method
                .compact();
    }
}
How to decode and verify jwts
The final step in token authentication is to decode the string and verify jwts to ensure they are valid.
Step 4: Validating the jwt token in your class
Using the jjwt library, you can easily parse and check the tokens.
Java
import io.jsonwebtoken.Claims;
import io.jsonwebtoken.Jwts;

public class JwtValidator {
    public Claims validateToken(String token) {
        return Jwts.parserBuilder()
                .setSigningKey(JwtUtil.getSecretKey())
                .build()
                .parseClaimsJws(token) // verify jwts here
                .getBody();
    }
}
Best Practices for java jwt security
- Algorithm Selection: Always use a strong algorithm like HS256 or RS256.
- Short Expiration: Set a short life for your tokens to improve security.
- Secure Storage: On the front end, never store a jwt token in local storage where it’s vulnerable to XSS; instead, use an html HttpOnly cookie.
- Spring Integration: If you are using spring, leverage its built-in filters to handle tokens automatically.
Conclusion
Mastering java jwt implementation is essential for any modern developer. Whether you are using jjwt or other libraries, the ability to jwt create, sign, and decode data securely ensures your java api is production-ready.
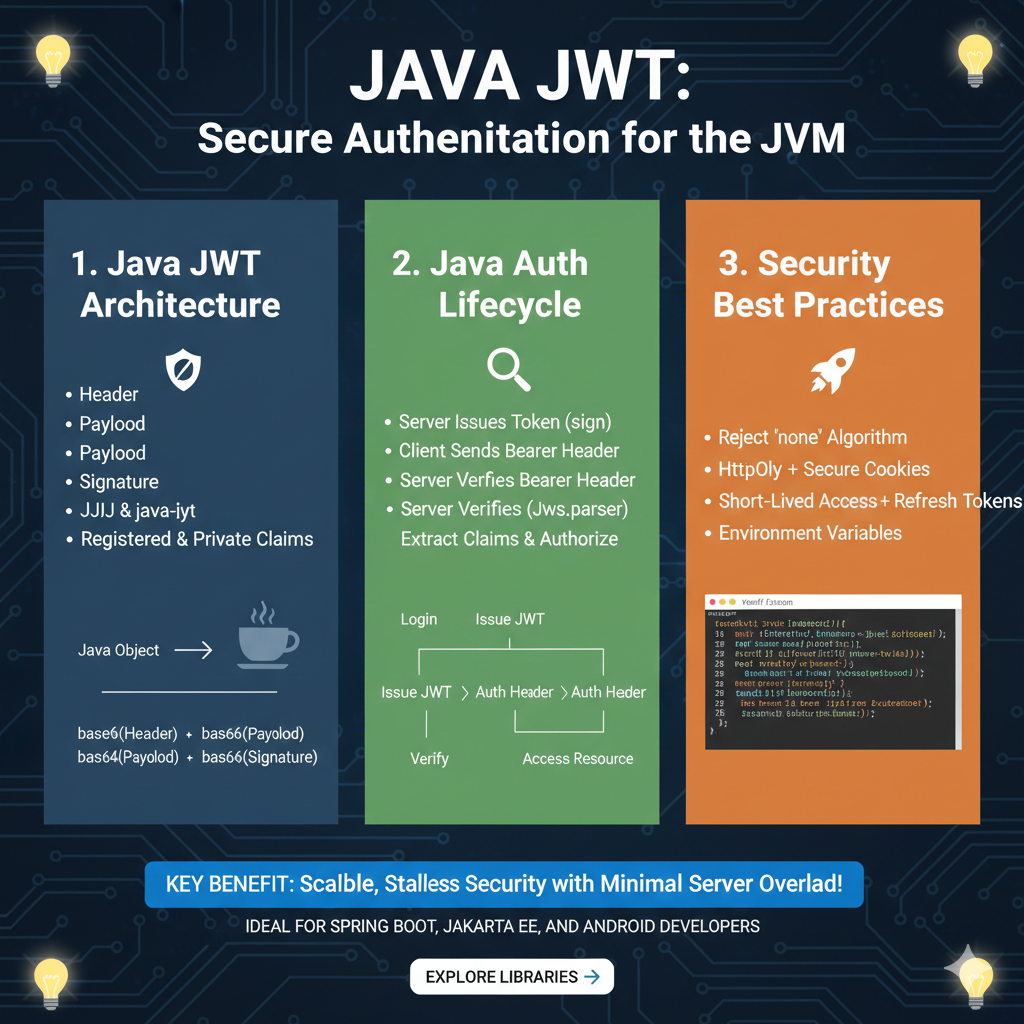
The infographic titled “JAVA JWT: Secure Authentication for the JVM” provides a technical roadmap for implementing JSON Web Tokens within Java-based backends using industry-standard libraries like JJWT or Auth0 java-jwt.
1. Java JWT Architecture (Blue)
This section outlines the structure of a token and the libraries used within the Java ecosystem:
- Token Components: Breaks down a JWT into its standard Header, Payload, and Signature.
- Java Libraries: Recommends using established libraries such as JJIJ (JJWT) and java-iyt (java-jwt).
- Claims: Supports both Registered & Private Claims for granular user data management.
- Encoding Process: Illustrates a Java Object being transformed into a dot-separated string consisting of base64-encoded segments (e.g.,
base64(Header) + base64(Payload) + base64(Signature)).
2. Java Auth Lifecycle (Green)
This module describes the sequence of events during a secure user session:
- Issuance: The process begins when the Server Issues Token (sign) after a user logs in.
- Communication: The Client Sends Bearer Header with the token to access protected resources.
- Verification: The Server Verifies Bearer Header using tools like
Jws.parser. - Authorization: After verification, the server will Extract Claims & Authorize the user to Access Resource.
3. Security Best Practices (Orange)
The final pillar details critical configurations for maintaining a secure JVM backend:
- Algorithm Integrity: Strictly Reject “none” Algorithm to prevent spoofing.
- Hardened Storage: Recommends using HttpOnly + Secure Cookies to protect tokens from client-side attacks.
- Token Lifecycle: Encourages the use of Short-Lived Access + Refresh Tokens to limit exposure.
- Environment Safety: Advises managing sensitive keys through Environment Variables rather than hardcoding.
- Visual Guide: Includes a code snippet showing the implementation of custom logic for token parsing and claim extraction.
learn for more knowledge
Mykeywordrank-> Search for SEO: The Ultimate Guide to Keyword Research and SEO Site Checkup – keyword rank checker
Json Parser ->How to Effectively Use a JSON Parser API: A Comprehensive Guide – json parse
Json Compare ->compare json online free: Master json compare online with the Best json compare tool and online json Resources – online json comparator
Fake Json –>fake api jwt json server: Create a free fake rest api with jwt authentication – fake api