Introduction to Spring Security and JWT
Securing modern web applications and APIs is paramount. Spring Security provides a robust security framework for authentication and authorization, while JSON Web Tokens (JWT tokens) offer a stateless, compact, and URL-safe way to represent claims between two parties. Combining these two technologies is a powerful approach for building secure RESTful services.
This guide will walk you through the process of setting up Spring Security JWT for token-based authentication in a Spring Boot application.
Why use JWT with Spring Security?
- Stateless Authentication: JWT tokens eliminate the need for server-side sessions, making your application more scalable. This is the core difference from traditional Spring Security sessions.
- Decoupling: The client sends the JWT with each request, and the server (resource server) validates it independently.
- Microservices/OAuth Compatibility: JWT is the preferred method for implementing security oauth (OAuth 2.0), where an authorization server issues the access token (JWT) to be validated by a resource server.
Step-by-Step Implementation
Step 1: Project Setup and Dependencies
You’ll need the core Spring Security, Spring Boot, and the jjwt dependency for handling JWT tokens.
Step 2: Configure JWT Properties
Add JWT-related properties to your application.properties or application.yml (secret key and token expiration time).
Step 3: Create a JWT Utility Class (The JwtService)
This class, which acts as your JwtService, will handle the generation and validation of JWTs. It is responsible for:
- Generating the Token: Using a secret key and setting the subject (the user) and claims (such as roles).
- Extracting Claims: Parsing the JWT to extract claims like the username and expiration date.
- Validation: Checking if the token is valid and not expired against the provided userdetails.
Step 4: Create a Custom UserDetailsService
This service loads user-specific data (userdetails) for authentication. In a production scenario, this service would manage the roles and permissions from a database.
Step 5: Implement a JWT Authentication Filter
This crucial filter intercepts incoming requests to ensure every secured endpoint is checked. It performs the following steps:
- Extracts the JWT from the Authorization header (Bearer access token).
- Uses the JwtService (JwtUtil) to validate the token.
- If valid, it sets the authenticated user in the SecurityContextHolder, completing the jwt authentication flow.
Step 6: Configure Spring Security (SecurityConfig)
This is the central configuration of your security framework using Spring Security.
- Stateless Policy: We configure the sessionManagement to be SessionCreationPolicy.STATELESS—the hallmark of Spring Security JWT implementation.
- Authentication Manager: The AuthenticationManager is configured to handle the authentication process, relying on the DaoAuthenticationProvider and UserDetailsService.
- Filter Integration: We inject the JwtRequestFilter before the standard UsernamePasswordAuthenticationFilter to prioritize token validation for API requests.
- textJwtDecoder: While not explicitly used in this jjwt example, a JwtDecoder is the component used in more advanced security oauth 2.0 implementations (resource server configuration) to decode and validate access tokens from an external authorization server.
Step 7: Create an Authentication Controller
This controller handles the POST request to authenticate:
- It calls the AuthenticationManager to authenticate the user credentials (username/password).
- If successful, it uses the JwtService to generate a new JWT token.
- The JWT is returned to the client for use as an access token in future requests.
Conclusion
You have successfully implemented Spring Security JWT for stateless authentication in your Spring Boot application. This setup, leveraging a custom JwtService and JWT filter, provides a solid foundation for securing RESTful APIs and is compatible with modern security oauth architectures.
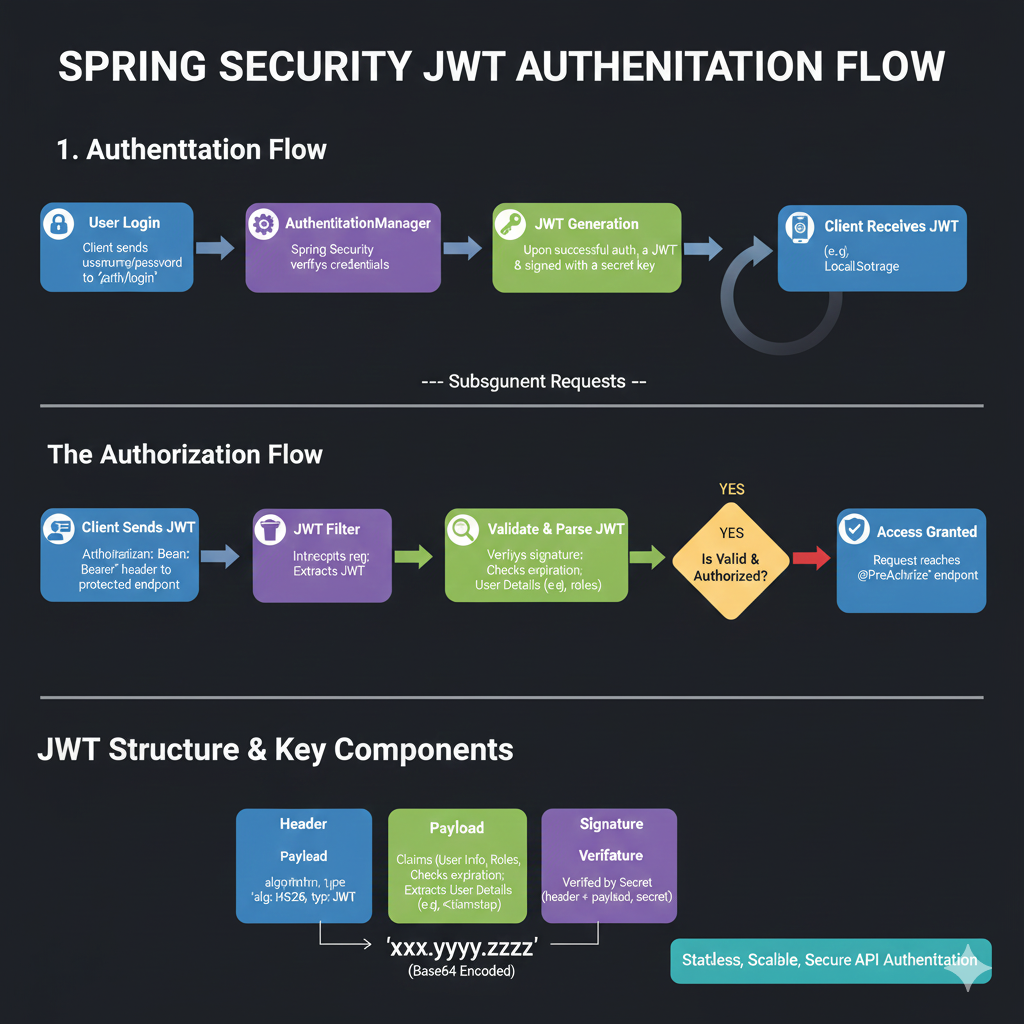
Spring Security JWT Authentication Flow
1. Authentication Flow (Initial Login)
This outlines how a user gets a JWT after successfully logging in:
- User Login: The client sends the username/password to the
/auth/loginendpoint. - AuthenticationManager: Spring Security verifies the user’s credentials.
- JWT Generation: Upon successful authentication, a JWT is generated and signed with a secret key.
- Client Receives JWT: The client receives the JWT (e.g., stored in Local Storage).
2. The Authorization Flow (Subsequent Requests)
This explains how the JWT is used for accessing protected resources:
- Client Sends JWT: The client includes the
Authorization: Bearer <token>header in requests to protected endpoints. - JWT Filter: The filter intercepts the request and extracts the JWT.
- Validate & Parse JWT: The system verifies the signature and checks the token’s expiration, extracting user details like roles.
- Is Valid & Authorized? A decision point checks if the token is both valid and the user is authorized.
- YES: Access is granted, and the request reaches the
@PreAuthorizeendpoint.
- YES: Access is granted, and the request reaches the
3. JWT Structure & Key Components
A JWT is shown as three parts separated by dots, xxx.yyy.zzz, which are Base64 encoded.
- Header (Blue): Contains the algorithm (
alg: HS256) and token type (typ: JWT). - Payload (Green): Contains Claims (User Info, Roles) and extracts user details (e.g., timestamp).
- Signature (Purple): Verified by a Secret Key using the formula:
Header + Payload + Secret.
learn for more knowledge
Json parser-> Express JSON Parser: A Comprehensive Guide to express.json – json parse
Mykeywordrank-> Search Engine Optimization What It Is and How to Do It Effectively – keyword rank checker
Json Compare ->How to Compare Two JSON Objects: A Comprehensive Guide – online json comparator
Fake Json –>How to Create Fake JSON API Online: Boost Your Development Workflow – fake api
Leave a Reply