Introduction to JWT and Node.js Authentication
JSON Web Tokens (JWT) have become a standard for securing APIs and single-page applications. They provide a compact, URL-safe means of representing claims to be transferred between two parties. In the context of Node.js, JWT offers a robust way to handle user authentication and authorization without the need for server-side sessions. This guide will walk you through the process of integrating JWT into your Node.js applications, enhancing their security and scalability.
What is a JSON Web Token (JWT)?
A JWT consists of three parts separated by dots (.): a header, a payload, and a signature.
- Header: Typically consists of two parts: the type of the token (JWT) and the signing algorithm used (e.g., HMAC SHA256 or RSA).
- Payload: Contains the claims. Claims are statements about an entity (typically, the user) and additional data. Standard claims include
iss(issuer),exp(expiration time),sub(subject), etc. You can also include custom claims. - Signature: Used to verify the sender of the JWT and to ensure that the message hasn’t been changed along the way. It’s created by taking the encoded header, the encoded payload, a secret, and the algorithm specified in the header.
The beauty of JWT is that once signed, the token can be trusted by the server as long as the secret key remains private.
Prerequisites
Before diving into the implementation, ensure you have:
- Node.js and npm installed on your system.
- Basic understanding of Node.js and Express.js.
- A code editor (e.g., VS Code).
Step-by-Step Implementation: Node.js JWT
1. Set Up Your Node.js Project
First, create a new project directory and initialize a Node.js project.
mkdir node-jwt-auth
cd node-jwt-auth
npm init -y
2. Install Required Packages
We’ll need express for our web server, jsonwebtoken to work with JWTs, and dotenv to manage environment variables for our secret key.
npm install express jsonwebtoken dotenv3. Configure Environment Variables
Create a .env file in your project root to store your JWT secret key. This is crucial for security.
JWT_SECRET=YOUR_VERY_STRONG_SECRET_KEYReplace YOUR_VERY_STRONG_SECRET_KEY with a long, random string.
4. Create Your Express Application
Create an app.js (or server.js) file.
// app.js
require('dotenv').config();
const express = require('express');
const jwt = require('jsonwebtoken');

const app = express();
app.use(express.json()); // Enable JSON body parsing

const PORT = process.env.PORT || 3000;
const JWT_SECRET = process.env.JWT_SECRET;

if (!JWT_SECRET) {
  console.error('JWT_SECRET not defined in .env file!');
  process.exit(1);
}

// Simple users (for demonstration)
const users = [
  { id: 1, username: 'user1', password: 'password1' },
  { id: 2, username: 'user2', password: 'password2' }
];

// Start the server
app.listen(PORT, () => {
  console.log(`Server running on port ${PORT}`);
});
5. Implement User Login and JWT Generation
Add a login route that, upon successful authentication, generates a JWT.
// ... (previous code)

// Login route to generate a JWT
app.post('/login', (req, res) => {
  const { username, password } = req.body;

  // Authenticate user (in a real app, you'd check a database)
  const user = users.find(u => u.username === username && u.password === password);

  if (!user) {
    return res.status(401).json({ message: 'Invalid credentials' });
  }

  // Generate JWT
  const token = jwt.sign(
    { userId: user.id, username: user.username },
    JWT_SECRET,
    { expiresIn: '1h' } // Token expires in 1 hour
  );

  res.json({ token });
});

// ... (remaining code)
6. Create JWT Verification Middleware
This middleware will protect routes by verifying the incoming JWT.
// ... (previous code)

// Middleware to verify JWT
function authenticateToken(req, res, next) {
  const authHeader = req.headers['authorization'];
  const token = authHeader && authHeader.split(' ')[1]; // Bearer TOKEN

  if (token == null) {
    return res.sendStatus(401).json({ message: 'No token provided' });
  }

  jwt.verify(token, JWT_SECRET, (err, user) => {
    if (err) {
      return res.sendStatus(403).json({ message: 'Invalid token' });
    }
    req.user = user; // Attach user payload to the request
    next();
  });
}

// ... (remaining code)
7. Protect Routes with the Middleware
Apply the authenticateToken middleware to any routes you want to secure.
// ... (previous code)

// Protected route example
app.get('/protected', authenticateToken, (req, res) => {
  res.json({ message: `Welcome ${req.user.username}! This is a protected route.`, user: req.user });
});

// ... (remaining code)
Testing Your JWT Authentication
You can use tools like Postman or Insomnia to test your API:
- Login: Send a POST request to
/loginwithusernameandpasswordin the body. You should receive a JWT. - Access Protected Route: Send a GET request to
/protected. In the headers, includeAuthorization: Bearer YOUR_GENERATED_TOKEN.
Security Best Practices for JWT in Node.js
- Keep Your Secret Key Secure: Never hardcode it. Use environment variables.
- Set Expiration Times: Use
expiresInto limit token validity, reducing the risk of compromised tokens. - Use HTTPS: Always transmit tokens over secure channels to prevent interception.
- Refresh Tokens (for long sessions): For extended user sessions, implement refresh tokens to issue new access tokens without requiring re-authentication every time the short-lived access token expires.
- Don’t Store Sensitive Data in Payload: JWT payloads are only encoded, not encrypted. Anyone with the token can read its contents.
- Token Invalidation: While JWTs are stateless, you might need a mechanism (like a blacklist) for immediate invalidation in case of logout or compromise.
Conclusion
Implementing JWT authentication in your Node.js application provides a powerful, stateless way to manage user sessions and secure your API endpoints. By following the steps outlined in this guide and adhering to best practices, you can build robust and secure authentication systems.
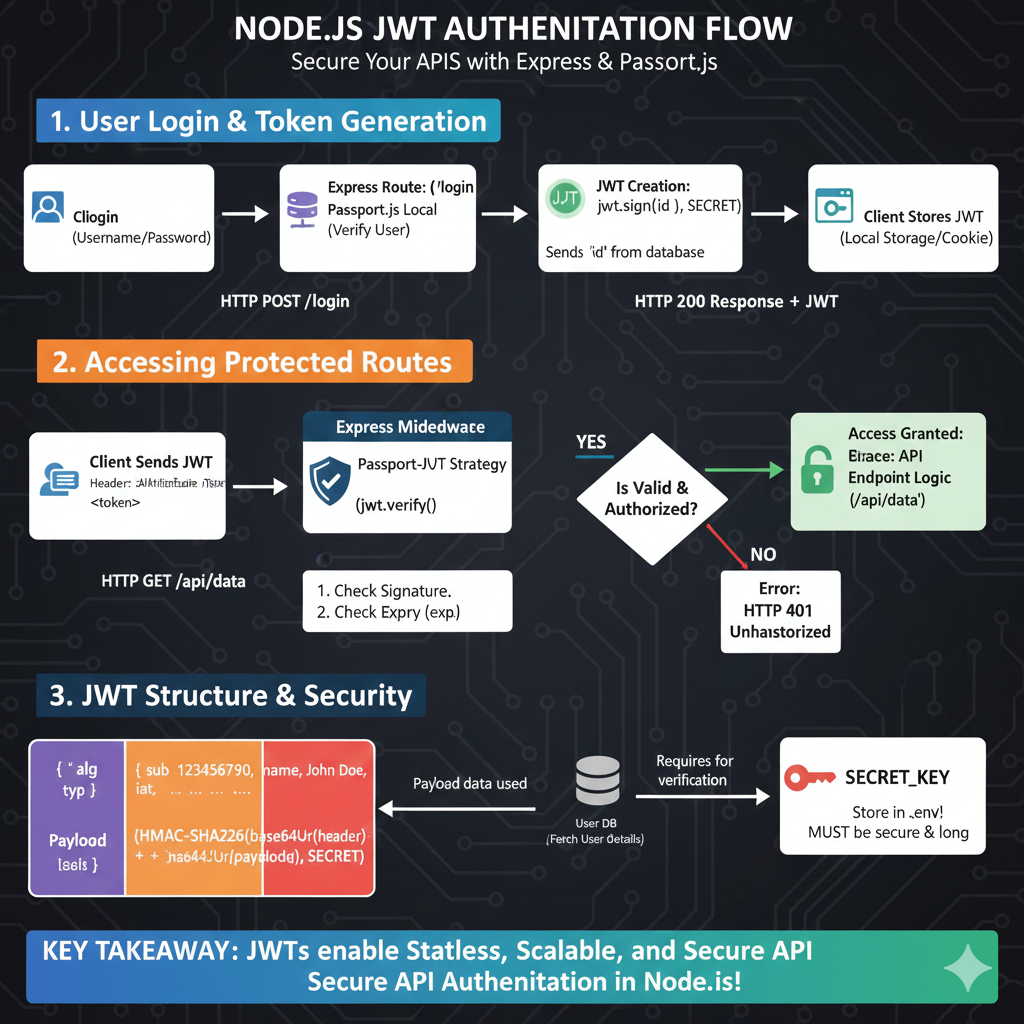
Based on the provided infographic titled “NODE.JS JWT AUTHENTICATION FLOW: Secure Your APIs with Express & Passport.js”, here is the detailed content breakdown:
🔐 Node.js JWT Authentication Guide
The infographic illustrates a secure, three-part system for managing user identity and access in a Node.js environment.
1. User Login & Token Generation
This stage covers the initial authentication process:
- Client Login: A user submits their Username and Password via an HTTP POST /login request.
- Express Route: The request is handled by an Express route using the Passport.js Local Strategy to verify the user.
- JWT Creation: Once verified, the server generates a token using
jwt.sign(id, SECRET). - Storage: The server returns an HTTP 200 Response + JWT, which the client then stores in Local Storage or a Cookie.
2. Accessing Protected Routes
This stage shows how the token is used for subsequent authorized requests:
- Client Sends JWT: For an HTTP GET /api/data request, the client includes the token in the header as
Authorization: Bearer <token>. - Passport-JWT Strategy: Middleware verifies the token by checking the signature and the expiration (
exp). - Validation Check:
- YES: Access is granted to the API endpoint logic.
- NO: An HTTP 401 Unauthorized error is returned.
3. JWT Structure & Security
This section breaks down the technical components of a JSON Web Token:
- Token Components:
- Header: Contains metadata like the algorithm (
alg) and token type (typ). - Payload: Stores claims such as the subject (
sub), user name, and issued-at time (iat). - Signature: A hash created using the header, payload, and the secret key.
- Header: Contains metadata like the algorithm (
- Security Essentials:
- User DB: Payload data is used to fetch user details from the database.
- SECRET_KEY: This must be stored in a
.envfile and must be both secure and long.
KEY TAKEAWAY: JWTs enable Stateless, Scalable, and Secure API Authentication in Node.js.
learn for more knowledge
Json parser-> Fastest JSON Parser Python for Peak Performance: Why Orjson and Msgspec are the Top Contenders – json parse
Mykeywordrank-> How to Use a Rank Checker Effectively to Boost Your SEO – keyword rank checker
Json Compare ->How to Compare Two JSON Files Effectively: A Comprehensive Guide – online json comparator
Fake Json –>How to Use Dummy API JSON for Faster Development and Testing: Leveraging Fake APIs, JSON, and Mockaroo
Leave a Reply