In the evolving landscape of web and mobile applications, secure and efficient authentication and authorization mechanisms are paramount. OAuth2 provides a robust framework for delegated authorization, while a JSON Web Token (JWT) offers a compact, URL-safe means of representing claims. When combined, oauth authentication and jwt create a powerful, stateless, and scalable solution for securing your api and application.
By using a web token for identity verification, you can eliminate the need for server-side session storage, significantly improving the scalability of your resource server.
Understanding the JWT Bearer Flow and Access Token Before diving into the configuration, let’s clarify the authorization flows and how jwt tokens facilitate communication.
Roles in OAuth2 JWT
- Resource Owner: The user who owns the data.
- Client Application: The application requesting access.
- Authorization Server: The authentication server that issues the oauth token.
- Resource Server: The api hosting the resource, which validates the access token.
JSON Web Token Structure
A json web token consists of three parts that form the bearer flow security:
- Header: Metadata about the token type and algorithm.
- Payload: Contains claims about the user identity.
- Signature: Ensures the web token hasn’t been tampered with.
Implementing JSON Web Security: A Step-by-Step Guide
Step 1: Client Registration and Configuration
Your client application must be registered with the authorization server. This setup provides the credentials needed to initiate authentication oauth requests.
Step 2: Requesting an Authorization Grant
The client redirects the user to the authentication server. In modern spring or Node.js environments, this is the starting point of the flow.
Step 3: Obtaining the Access Token (JWT)
The client exchanges the grant for an access token. The authentication server responds with a json web token that serves as the jwt bearer.
JSON
{
    "access_token": "eyJhbGciOiJIUzI1Ni...",
    "token_type": "Bearer",
    "expires_in": 3600
}
Step 4: Using the JWT Bearer on the Resource Server
The client application sends the access token in the HTTP header. The resource server validates the jwt tokens without needing a session lookup, enabling a truly stateless api.
Best Practices for OAuth2 JWT and Access Control
To maintain high security in your oauth2 setup:
- Use Short-lived Tokens: Minimize the life of an access token.
- Validate All Claims: Ensure the resource server checks the
issandexpclaims in every web token. - Secure the Authorization Server: Your authentication server should be the only entity capable of signing tokens.
- Framework Support: If you are using Spring, leverage Spring Security for easier configuration of resource protection.
Conclusion
Implementing oauth2 jwt offers a modern way to handle authentication and authorization flows. By understanding the bearer flow and effectively managing your access token, you can build a secure identity layer for any application. Adhering to these json web token standards ensures your api remains robust and scalable.
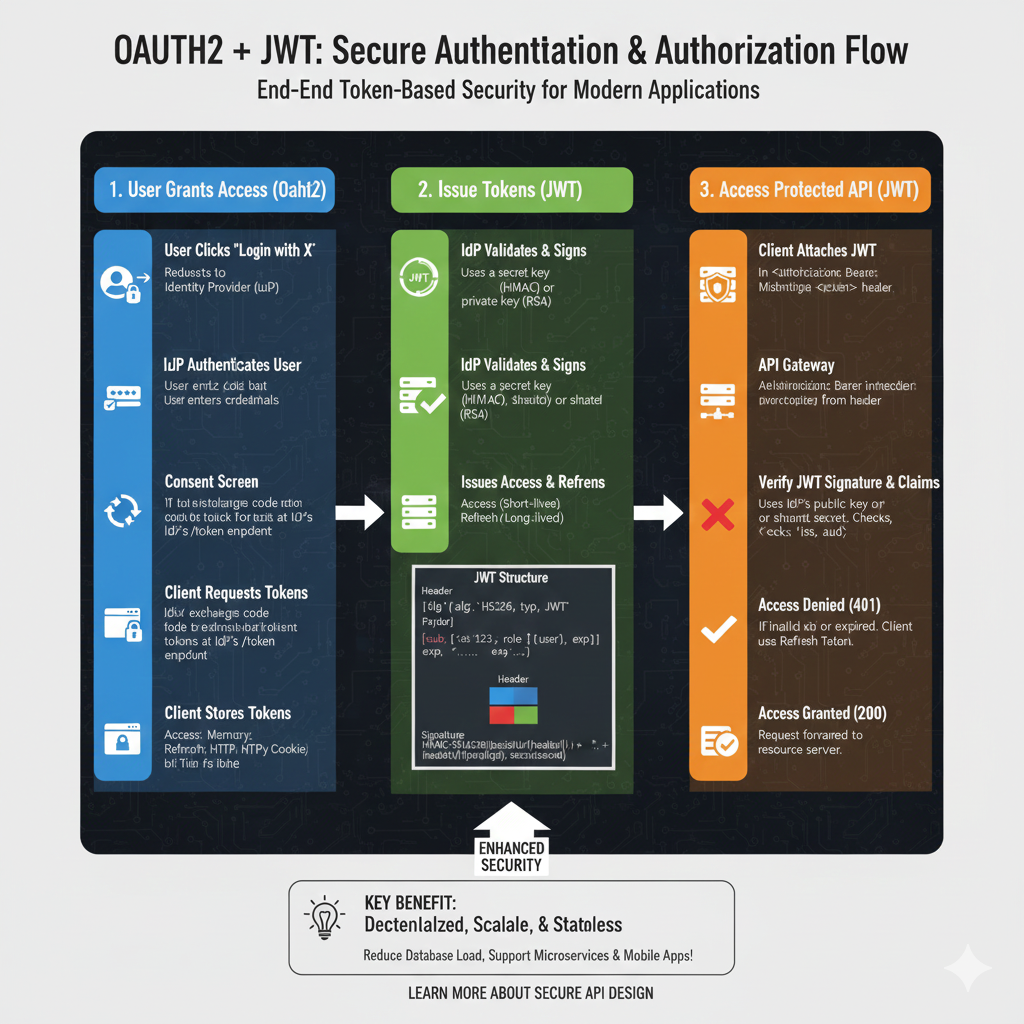
The Unified Security Workflow
The process is divided into three major phases that combine delegated authorization with stateless token-based authentication.
1. Authorization & Token Issuance (Blue)
This phase establishes trust and issues the initial credentials:
- Authorization Request: The client application requests access to resources on behalf of the user from the Authorization Server.
- User Consent: The user authenticates with the provider (e.g., Google or GitHub) and grants specific permissions (scopes) to the client.
- JWT Generation: Upon successful consent, the server generates a signed JWT Access Token containing user claims, roles, and expiration data.
- Payload Structure: The issued token typically includes three parts: a Header (algorithm), Payload (user data/claims like
subandexp), and a Signature (integrity check).
2. Stateless API Communication (Green)
This section covers how the client utilizes the issued token for repeated access:
- Bearer Token Header: The client attaches the JWT to every API request using the
Authorization: Bearer <token>header. - Independent Verification: The Resource Server (API) validates the token’s signature using a shared secret or public key without needing to call the Authorization Server again.
- Stateless Validation: Because the JWT is self-contained, the server extracts all necessary user info and permissions directly from the token, eliminating database lookups for session data.
3. Secure Resource Access (Orange)
The final stage determines the outcome of the request based on the token’s validity:
- Access Granted: If the token is valid and contains the required scopes, the Resource Server returns the protected data (e.g., a user profile or private files).
- Access Denied: If the token has expired, been tampered with, or lacks the necessary permissions, the server returns a 401 Unauthorized or 403 Forbidden error.
- Token Refresh: For long-term sessions, a Refresh Token can be used to obtain a new Access Token once the current one expires, maintaining a seamless user experience.
🚀 Key Security Benefits
- Scalability: Perfect for microservices as each service can verify tokens independently.
- Reduced Server Load: Eliminates the need for centralized session storage (like Redis or DB lookups).
- Delegated Access: Users never share their actual passwords with the third-party client application.
learn for more knowledge
Mykeywordrank-> small seo tool for keyword rank checking and local rank checker – keyword rank checker
Json Parser->Jackson JSON Parser: A Comprehensive Guide to Parse JSON for Java Developers – json parse
Json Compare ->How to Effectively Use a JSON Comparator Online: Your Ultimate Guide to JSON Compare, and JSON Diff – online json comparator
Fake Json –>How to Generate and Use Dummy JSON Data for Development and Testing – fake api
Leave a Reply