In the modern landscape of microservices and springframework boot applications, securing your endpoints is paramount. jwt authentication has emerged as a popular, efficient, and stateless method for handling authentication and authorization. This guide will walk you through the process of implementing security jwt in a spring boot jwt project, ensuring your APIs are secured and scalable.
What is a json web token (JWT)?
A json web token (JWT) is a compact, URL-safe json web standard for representing claims to be transferred between a client and a server. Within a jwt spring boot environment, the token consists of three parts:
- Header: Contains the token type and the encryption algorithm (e.g., rsa or HMAC SHA256).
- Payload: Contains the jwt claims and userinfo.
- Signature: Created using a key to verify the sender and ensure the json web data hasn’t been changed.
Why Choose jwt authentication for spring boot?
Integrating jwt token logic with spring offers several advantages:
- Statelessness: The api server does not need to store session info.
- Scalability: Ideal for a resource server in a distributed springframework ecosystem.
- Decentralized: An authorization server can issue the key, and any resource server can validate it.
Step-by-Step jwt spring boot Implementation
Step 1: Add the dependency
Create a new springframework boot project and add the security dependency to your pom.xml.
XML
<dependency>
    <groupId>org.springframework.boot</groupId>
    <artifactId>spring-boot-starter-security</artifactId>
</dependency>
<dependency>
    <groupId>io.jsonwebtoken</groupId>
    <artifactId>jjwt-api</artifactId>
    <version>0.11.5</version>
</dependency>
Step 2: Create the jwtservice Utility
This jwtservice (often named JwtUtil) handles the encryption and generation of the jwt token. It uses a key to sign the payload.
Java
@Component
public class JwtService { // Your utility for jwt token management
    @Value("${jwt.secret}")
    private String SECRET_KEY;

    public String generateToken(UserDetails userDetails) {
        return Jwts.builder()
                .setSubject(userDetails.getUsername())
                .signWith(getSignKey(), SignatureAlgorithm.HS256)
                .compact();
    }
}
Step 3: Implement userdetails and authentication
The springframework security layer requires a userdetails service to load user data. This is the heart of your authentication logic.
Java
@Service
public class CustomUserDetailsService implements UserDetailsService {
    @Override
    public UserDetails loadUserByUsername(String username) {
        // Fetch user from DB and return userdetails
        return new User("user", "password_encoded", new ArrayList<>());
    }
}
Step 4: Configure the authorization server Logic
In spring boot, you must define a security filter chain. For advanced rsa configurations, you might use a public jwtencoder and public jwtdecoder to handle asymmetric encryption.
Java
@Bean
public SecurityFilterChain securityFilterChain(HttpSecurity http) throws Exception {
    http.csrf(csrf -> csrf.disable())
        .authorizeHttpRequests(auth -> auth
            .requestMatchers("/authenticate").permitAll()
            .anyRequest().authenticated()
        )
        .sessionManagement(s -> s.sessionCreationPolicy(SessionCreationPolicy.STATELESS));

    http.addFilterBefore(jwtRequestFilter, UsernamePasswordAuthenticationFilter.class);
    return http.build();
}
tests and Validation
Before deploying to your api server, perform unit tests to ensure your secured endpoints reject requests without a valid bearer token. Use spring-security-test to simulate an authenticated user.
Testing the auth Flow:
- Login: Send a POST request to
/authenticate. - Response: Receive the jwt token.
- Access: Use the token in the Authorization header for all subsequent application calls.
Best Practices for spring boot jwt
- Key Management: Use a strong rsa key and never hardcode it in the application.
- Token Expiration: Always set an
expclaim to limit the life of the jwt token. - Use Refresh Tokens: Separate your access logic from long-term sessions.
- Public/Private Keys: For high security, utilize a public jwtdecoder on your resource server and keep the private key on the authorization server.
Conclusion
Implementing jwt authentication in spring boot provides a robust, scalable solution for your APIs. By following this guide, you have integrated springframework security, created a jwtservice, and secured your user data.
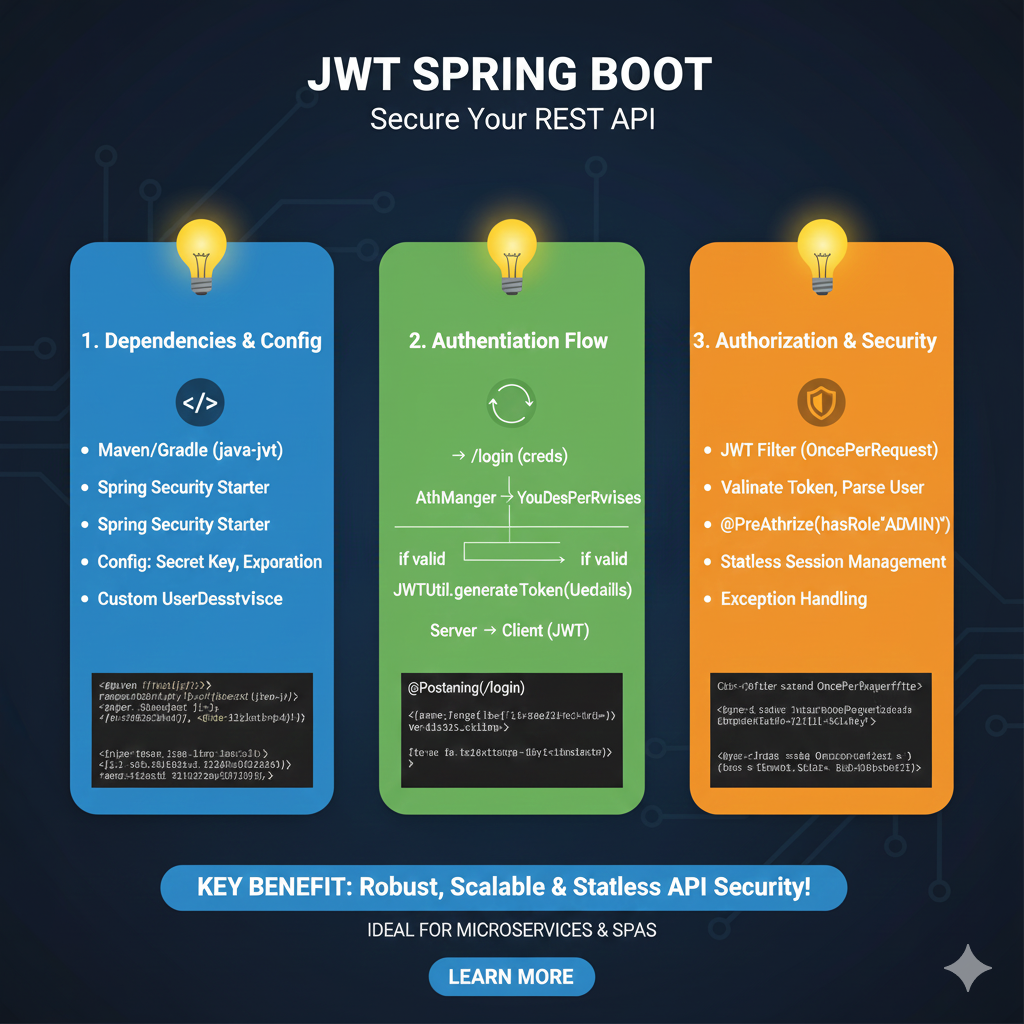
The infographic titled “JWT SPRING BOOT: Secure Your REST API” provides a high-level roadmap for integrating JSON Web Token (JWT) authentication into a Java-based microservice architecture.
🛡️ Spring Boot Security Implementation Guide
The process is divided into three architectural phases to ensure a robust and stateless security layer:
1. Dependencies & Config (Blue)
This stage focuses on setting up the environment and security parameters:
- Project Setup: Includes necessary dependencies such as Maven/Gradle (java-jwt) and the Spring Security Starter.
- Security Variables: Configuring the Secret Key for signing tokens and setting the Expiration time for session validity.
- Identity Management: Implementation of a Custom UserDetailsService to load user-specific data during authentication.
2. Authentication Flow (Green)
This section illustrates the logic for verifying user identity and issuing tokens:
- Credential Verification: The user sends credentials to the
/loginendpoint, which are processed by the AuthenticationManager. - Token Generation: If the credentials are valid, the JWTUtil utility generates a signed token based on the user’s details.
- Issuance: The server returns the JWT to the client for use in future requests.
3. Authorization & Security (Orange)
The final stage covers protecting resources and validating incoming requests:
- Request Interception: A JWT Filter (OncePerRequestFilter) intercepts every incoming call to validate the token and parse the user identity.
- Role-Based Access: Uses annotations like @PreAuthorize(hasRole(“ADMIN”)) to restrict access to specific endpoints.
- System Integrity: Implements Stateless Session Management (no server-side sessions) and robust Exception Handling for unauthorized access.
learn for more knowledge
Mykeywordrank-> SEO Search Engine Optimization: Mastering the Search Engine for Traffic – keyword rank checker
json parser->How to json data parse: A Comprehensive Guide for Developers – json parse
Json Compare ->api response comparison tool – The Ultimate Guide to compare with a json compare tool and json diff tool – online json comparator
Fake Json –>How to Utilize dummy json rest api for Rapid Front-End Development and fake rest api Testing – fake api
Leave a Reply