Securing modern web applications is paramount, and a json web token (jwt) has emerged as a popular, stateless, and efficient method for handling user authentication and authorization. This guide will walk you through the process of how to implement jwt authentication in a spring boot project from scratch, ensuring your resource endpoints are secured and robust.
What is a json web token (jwt)?
A jwt is an open standard (RFC 7519) that defines a compact and self-contained way for securely transmitting userinfo between parties as a JSON object. In the context of spring security, these tokens are digitally signed using a key (often using RSA or HMAC algorithms) to ensure the integrity of the encryption.
Why implement jwt with spring boot?
- Stateless: No session data is stored on the boot server, which is perfect for the springframework boot microservices architecture.
- Scalability: Requests can be handled by any server in a cluster without session affinity.
- Mobile-Friendly: jwt token strings are easily consumed by mobile apps and SPAs.
- Security jwt: Signed tokens prevent tampering and ensure high-level user authentication.
Step 1: Create a spring boot project
Start by generating a new spring boot project using Spring Initializr. To follow this spring boot jwt authentication example, select the following dependencies:
- Spring Web
- springframework security
- Spring Data JPA & H2 Database (for user storage)
- Lombok
Step 2: Add springframework Dependencies
In your pom.xml, add the JJWT library. This allows your boot app to handle the jwt token creation and jwtdecoder logic.
XML
<dependency>
    <groupId>io.jsonwebtoken</groupId>
    <artifactId>jjwt-api</artifactId>
    <version>0.11.5</version>
</dependency>
Step 3: Configure the encryption key
Add your jwt properties to application.properties. This key is the foundation of your security jwt implementation.
Properties
# application.properties
jwt.secret=yourSuperSecretRSAKeyOrHMACKeyForEncryption
jwt.expiration=3600000
Step 4: Create a jwtservice Utility Bean
This bean (or jwtservice) handles generating the token and extracting userinfo.
Java
@Component
public class JwtService { // Often referred to as JwtUtil or JwtService
    @Value("${jwt.secret}")
    private String key;

    public String generateToken(String username) {
        return Jwts.builder()
                .setSubject(username)
                .setIssuedAt(new Date())
                .signWith(SignatureAlgorithm.HS256, key)
                .compact();
    }
    // ... validation logic
}
Step 5: implement user authentication Logic
Spring security needs to load user data. You must implement a service that provides the user details to the authentication manager.
Java
@Service
public class CustomUserDetailsService implements UserDetailsService {
    // Logic to load user from database for authentication spring
}
Step 6: Configure security spring
In your boot application, the SecurityFilterChain bean defines which routes are public and which are secured.
Java
@Configuration
@EnableWebSecurity
public class SecurityConfig {

    @Bean
    public SecurityFilterChain securityFilterChain(HttpSecurity http) throws Exception {
        http.csrf(csrf -> csrf.disable())
            .authorizeHttpRequests(auth -> auth
                .requestMatchers("/authenticate", "/public/**").permitAll() // Public endpoints
                .anyRequest().authenticated() // Secured resource
            )
            .sessionManagement(session -> session.setSessionCreationPolicy(SessionCreationPolicy.STATELESS))
            .authenticationProvider(authenticationProvider())
            .addFilterBefore(jwtAuthFilter, UsernamePasswordAuthenticationFilter.class);
        return http.build();
    }

    @Bean
    public AuthenticationManager authenticationManager(AuthenticationConfiguration config) throws Exception {
        return config.getAuthenticationManager(); // The core authentication manager
    }
}
Step 7: Create the security jwt Filter
The jwt filter intercepts every request, extracts the token, and validates it through the jwtservice.
Java
@Component
public class JwtAuthFilter extends OncePerRequestFilter {
    // Extracts Bearer token and sets the SecurityContext
}
Step 8: Define the authentication spring Controller
Create a controller to handle the login request. On successful user authentication, the authentication manager will verify the credentials and return a jwt token.
Java
@PostMapping("/authenticate")
public String authenticate(@RequestBody AuthRequest authRequest) {
    Authentication auth = authenticationManager.authenticate(
        new UsernamePasswordAuthenticationToken(authRequest.getUsername(), authRequest.getPassword())
    );
    return jwtservice.generateToken(authRequest.getUsername());
}
Conclusion and Best Practices
By following this spring boot jwt authentication example, you have integrated springframework security with a stateless json web token system. To maintain a secured environment, always:
- Use encryption for your key.
- Keep the token lifespan short.
- Ensure all resource endpoints use HTTPS.
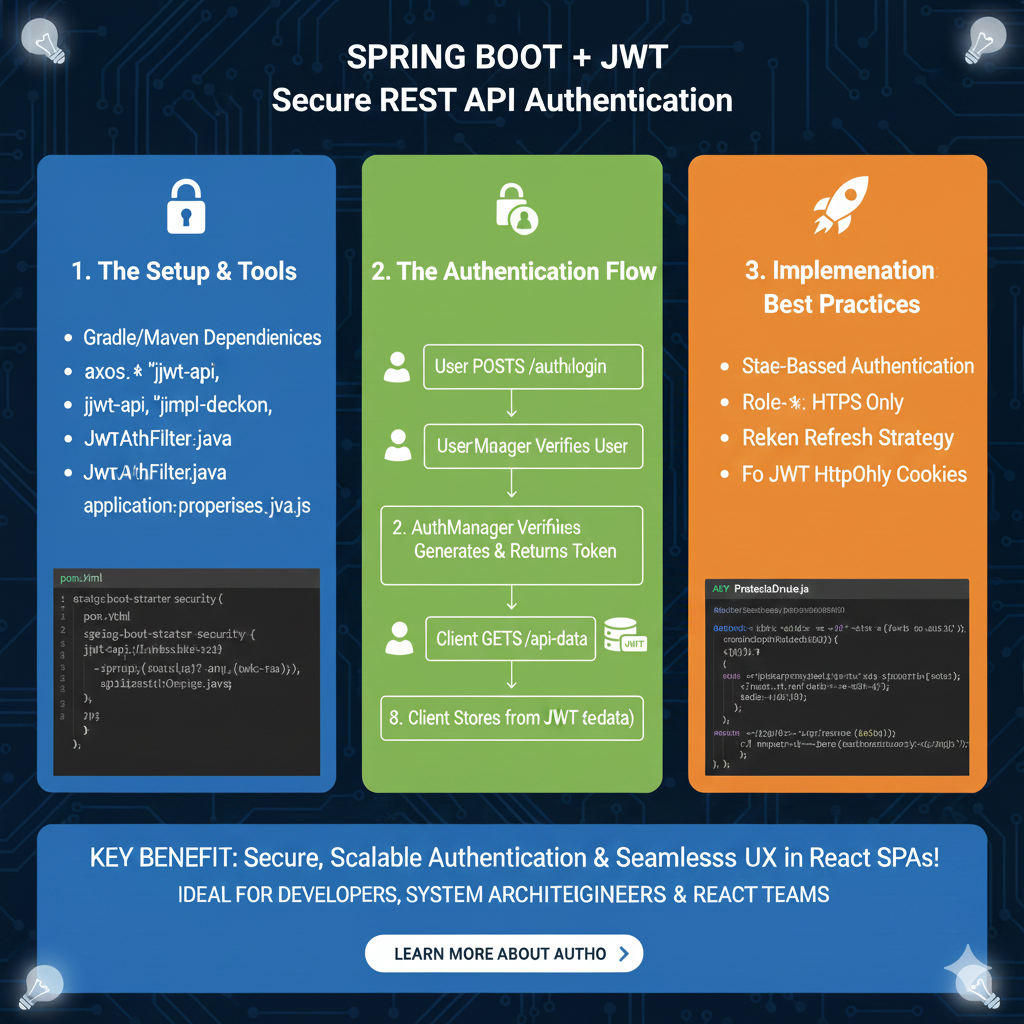
Implementing Secure Spring Boot Authentication
The guide is organized into three core modules that cover the necessary tooling, the logical flow of credentials, and industry-standard security practices:
1. The Setup & Tools (Blue)
This section details the initial configuration and dependencies required to integrate JWT into a Spring Boot environment:
- Dependency Management: Use Gradle or Maven to include essential libraries like
spring-boot-starter-securityandjjwt-api. - Core Components: Requires the creation of specialized Java classes such as
JwtAuthFilter.javato intercept and validate incoming requests. - Configuration: Proper setup of
application.propertiesorapplication.ymlis necessary to manage security secrets and token expiration settings. - Code Reference: Provides a sample
pom.xmlsnippet showing the inclusion of Spring Security and JWT dependencies.
2. The Authentication Flow (Green)
This module illustrates the step-by-step communication between the user and the AuthManager:
- Login Initiation: The process begins when a User POSTs to
/auth/loginwith their credentials. - Verification: The AuthManager verifies the user identity against the database.
- Token Generation: Upon successful verification, the system generates and returns a signed JWT to the client.
- Authorized Requests: The Client stores the JWT and includes it in subsequent requests, such as a GET to
/api-data, to access protected resources.
3. Implementation Best Practices (Orange)
The final pillar focuses on hardening the security of the implementation:
- Authentication Strategy: Recommends State-Based Authentication logic for managing user sessions effectively.
- Protocol Security: Emphasizes using HTTPS Only to prevent token interception during transit.
- Token Management: Advises implementing a Refresh Token Strategy to balance security with a smooth user experience.
- Cookie Security: Suggests storing JWTs in HttpOnly Cookies to mitigate the risk of Cross-Site Scripting (XSS) attacks.
learn for more knowledge
Mykeywordrank-> Search for SEO: The Ultimate Guide to Keyword Research and SEO Site Checkup – keyword rank checker
json Parser->json parse use: A Developer’s Guide to json parse, json.parse, and parse json strings – json parse
Json Compare ->compare json online free: Master json compare online with the Best json compare tool and online json Resources – online json comparator
Fake Json –>fake api jwt json server: Create a free fake rest api with jwt authentication – fake api
Leave a Reply