How to Implement Express JWT for Secure API Authentication
Securing your API is paramount in modern web development. JSON Web Tokens (JWTs) provide a robust, stateless mechanism for authentication, and when combined with Express.js, the express-jwt middleware simplifies their implementation. This guide will walk you through the process of setting up and using express-jwt to protect your API routes effectively.
What is JWT?
JWT, or JSON Web Token, is a compact, URL-safe means of representing claims to be transferred between two parties. The claims in a JWT are encoded as a JSON object that is digitally signed using a secret (with HMAC algorithm) or a public/private key pair using RSA or ECDSA. This signature ensures the integrity of the claims contained within the JWT and verifies the sender’s identity.
Why Use express-jwt?
- Simplified Integration: Seamlessly integrates JWT authentication into your Express.js application.
- Middleware-based: Protects routes by simply adding it as middleware.
- Error Handling: Provides built-in error handling for invalid or missing tokens.
- Customization: Allows for various configurations like algorithms, audience, issuer, and more.
Prerequisites
- Node.js installed
- npm or yarn package manager
- Basic understanding of Express.js
Step 1: Project Setup and Installation
First, let’s create a new Express project and install the necessary dependencies:
mkdir express-jwt-example
cd express-jwt-example
npm init -y
npm install express express-jwt jsonwebtoken dotenvexpress: Our web framework.express-jwt: The middleware for validating JWTs.jsonwebtoken: Used to sign and verify JWTs (we’ll use this for creating tokens).dotenv: To manage environment variables for our secret key.
Step 2: Configure Environment Variables
Create a .env file in your project root to store your secret key:
SECRET_KEY=yourSuperSecretKeyHereRemember to choose a strong, unique key for production environments.
Step 3: Basic Server Setup
Create an index.js file (or app.js) and set up a basic Express server:
require('dotenv').config();
const express = require('express');
const { expressjwt } = require('express-jwt');
const jsonwebtoken = require('jsonwebtoken');

const app = express();
const PORT = process.env.PORT || 3000;
const SECRET_KEY = process.env.SECRET_KEY;

app.use(express.json());

// Unprotected route
app.get('/', (req, res) => {
    res.send('Hello World! This is an unprotected route.');
});

// Login route to get a token
app.post('/login', (req, res) => {
    const { username, password } = req.body;

    // In a real application, you would verify username and password against a database
    // For simplicity, we'll use dummy credentials
    if (username === 'user' && password === 'pass') {
        const token = jsonwebtoken.sign({ userId: 1, role: 'admin' }, SECRET_KEY, { expiresIn: '1h' });
        return res.json({ token });
    }

    res.status(401).send('Invalid credentials');
});

// Middleware to protect routes
// This middleware will attach the decoded JWT payload to req.auth
app.use(
    expressjwt({
        secret: SECRET_KEY,
        algorithms: ['HS256'],
    }).unless({ path: ['/', '/login'] }) // Specify routes that do NOT require authentication
);

// Protected route
app.get('/protected', (req, res) => {
    // req.auth will contain the decoded JWT payload if authentication was successful
    res.json({ message: 'This is a protected route!', user: req.auth });
});

// Error handling for express-jwt
app.use((err, req, res, next) => {
    if (err.name === 'UnauthorizedError') {
        res.status(401).json({ message: 'Invalid Token or No Token Provided' });
    } else {
        next(err);
    }
});

app.listen(PORT, () => {
    console.log(`Server running on http://localhost:${PORT}`);
});
Explanation of the code:
require('dotenv').config();: Loads environment variables from.env.app.use(express.json());: Parses incoming request bodies with JSON payloads./loginroute:- Simulates a login. If credentials match, it uses
jsonwebtoken.sign()to create a new token. - The token includes a payload (e.g.,
userId,role), theSECRET_KEYfor signing, and an expiration time.
- Simulates a login. If credentials match, it uses
app.use(expressjwt({...}).unless({...}));:- This is where
express-jwtis integrated. secret: The key used to sign the JWT.algorithms: Specifies the allowed algorithms for the token signature.HS256is common.unless({ path: ['/', '/login'] }): This is crucial. It tellsexpress-jwtwhich paths should NOT be protected by the middleware. Our home page and login route must be accessible without a token.- For protected routes, if a valid token is present, its decoded payload will be available in
req.auth.
- This is where
/protectedroute: Can only be accessed with a valid JWT. It demonstrates accessing the decoded token data fromreq.auth.- Error Handling Middleware: Catches
UnauthorizedErrorthrown byexpress-jwtwhen a token is missing or invalid, sending a more user-friendly error response.
Step 4: Testing Your API
You can use tools like Postman, Insomnia, or curl to test your API.
1. Access Unprotected Route:
GET http://localhost:3000/Expected Output: Hello World! This is an unprotected route.
2. Get a Token (Login):
POST http://localhost:3000/login
Content-Type: application/json

{
    "username": "user",
    "password": "pass"
}
Expected Output: A JSON object containing your JWT, e.g., {"token": "eyJ..."}
Copy this token.
3. Access Protected Route (Without Token):
GET http://localhost:3000/protectedExpected Output: {"message":"Invalid Token or No Token Provided"} (or a different error message depending on exact error handling)
4. Access Protected Route (With Token):
GET http://localhost:3000/protected
Authorization: Bearer YOUR_COPIED_TOKEN_HERE
Replace YOUR_COPIED_TOKEN_HERE with the token you obtained from the login route.
Expected Output: {"message":"This is a protected route!","user":{"userId":1,"role":"admin","iat":...,"exp":...}}
Advanced Considerations
- Token Refresh: For long-lived sessions, implement refresh tokens to issue new access tokens without re-authenticating.
- Token Revocation: JWTs are stateless by nature, making direct revocation challenging. Strategies include blacklisting tokens on the server or using shorter expiry times.
- Role-Based Access Control (RBAC): Use the
req.auth.role(or similar property) to implement granular access control on your routes. - Secret Management: Never hardcode your secret key. Always use environment variables, and in production, consider more secure methods like AWS Secrets Manager or Azure Key Vault.
Conclusion
Implementing JWT authentication in your Express.js API using express-jwt is a straightforward yet powerful way to secure your endpoints. By following this guide, you’ve learned how to set up the middleware, generate tokens, and protect your routes, laying a solid foundation for building secure and scalable applications. Remember to always prioritize security best practices, especially when handling sensitive user data and authentication credentials.
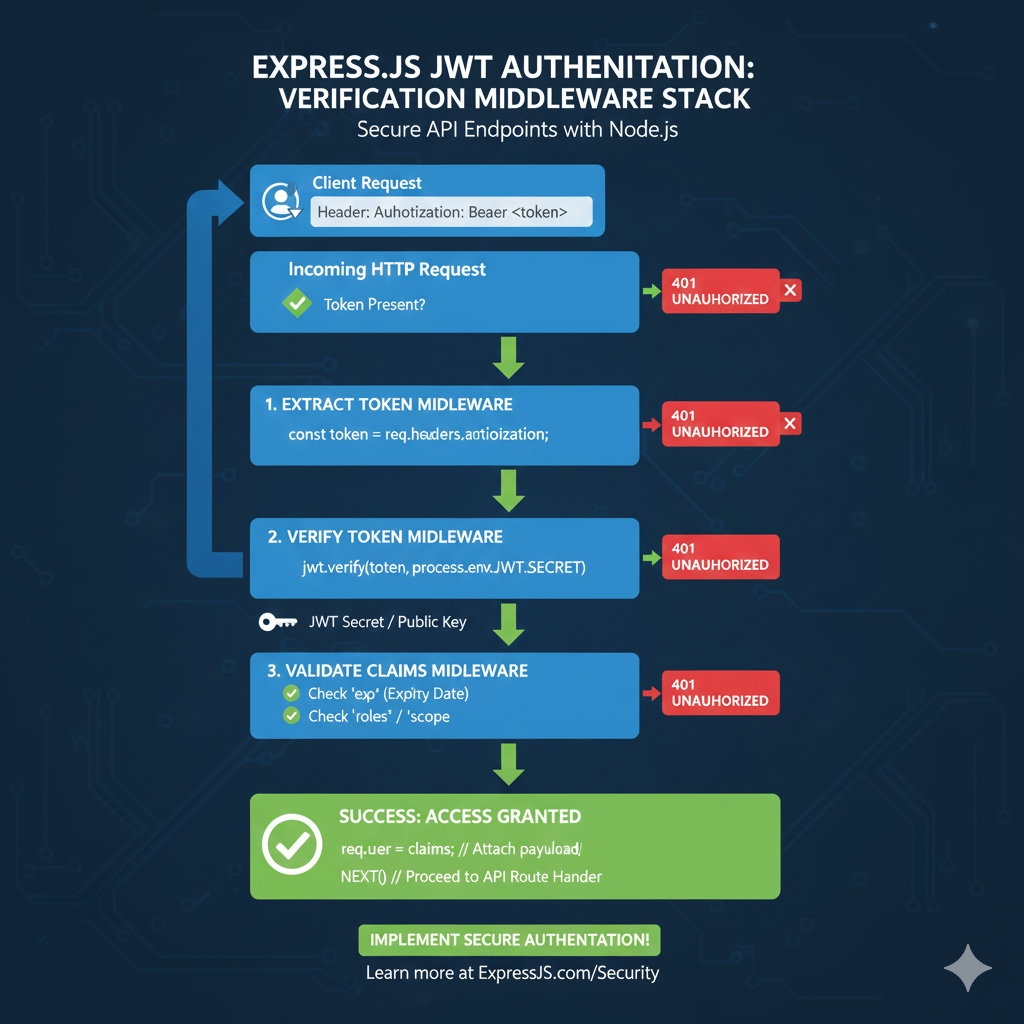
JWT Verification Middleware Stack
This infographic visualizes the stateless security checks that happen sequentially on every protected route in an Express.js application, ensuring only valid users gain access.
Incoming HTTP Request (Token Check) 📨
The process begins when a client attempts to access a protected API route.
- Client Request: The user sends a request with the JWT in the
Authorization: Bearer <token>header. - Initial Check: The system verifies if the Token is Present.
- Failure: If no token is found, the system immediately returns a 401 UNAUTHORIZED error.
1. Extract Token Middleware 🎣
This step retrieves the JWT string from the HTTP header.
- Action: Code extracts the token (e.g.,
const token = req.headers.authorization;).- Failure: If extraction fails (e.g., header malformed), returns 401 UNAUTHORIZED.
2. Verify Token Middleware 🔑
This is the core security check, ensuring the token has not been tampered with.
- Action: Code uses the signing key to verify the signature (e.g.,
jwt.verify(token, process.env.JWT_SECRET)). - Requirement: Access to the JWT Secret / Public Key is needed for this cryptographic check.
- Failure: If the signature is invalid (meaning the token was changed) or the token is malformed, returns 401 UNAUTHORIZED.
3. Validate Claims Middleware ✔️
This final check ensures the token is still usable, even if the signature is valid.
- Checks:
- Check
exp(Expiry Date): Ensures the token has not expired. - Check
roles/scope: Validates the user has the necessary permissions for the route. - Failure: If any claim validation fails, returns 401 UNAUTHORIZED.
- Check
SUCCESS: Access Granted! 🎉
If all middleware steps pass, access is granted.
- Action: The token’s claims (payload) are attached to the request object (e.g.,
req.user = claims;). - Result: NEXT() is called to proceed to the main API route handler.
learn for more knowledge
Json Parser ->WHAT IS API JSON Parser – JSON Parser API – JSON.parse – json parse
Mykeywordrank->Google Website Rank Checker- Track Your Keyword Rank and SEO Performance – keyword rank checker
Json Compare ->What Is JSON Diff Online? (Beginner-Friendly Explanation) – online json comparator
Fake Json –>Fake JSON API: Using JSONPlaceholder, DummyJSON, and Mock API – fake api
Leave a Reply