How to Implement JWT Authentication in Node.js Applications
In today’s interconnected world, securing your APIs is paramount. JSON Web Tokens (JWT) provide a robust, stateless way to handle authentication and authorization in modern web applications. This comprehensive guide will walk you through the process of implementing JWT authentication in your Node.js and Express.js applications, ensuring your endpoints are secure and your data protected.
What is JWT?
JWT, or JSON Web Token, is an open standard (RFC 7519) that defines a compact and self-contained way for securely transmitting information between parties as a JSON object. It’s often used for authentication where a server generates a token that certifies a user’s identity and then sends it to the client. The client can then use this token to prove their identity to subsequent requests.
A JWT consists of three parts, separated by dots:
- Header: Contains the type of token (JWT) and the signing algorithm (e.g., HMAC SHA256 or RSA).
- Payload: Contains the claims, which are statements about an entity (typically, the user) and additional data.
- Signature: Used to verify that the sender of the JWT is who it says it is and to ensure that the message hasn’t been changed along the way.
Prerequisites
- Basic understanding of Node.js and Express.js.
- Node.js and npm installed on your machine.
- A code editor (e.g., VS Code).
Step 1: Project Setup and Dependencies
First, let’s create a new Node.js project and install the necessary packages:
mkdir jwt-node-app
cd jwt-node-app
npm init -y
npm install express jsonwebtoken dotenv bcryptjsexpress: Our web framework.jsonwebtoken: For creating and verifying JWTs.dotenv: To manage environment variables securely.bcryptjs: For hashing passwords (crucial for user registration/login).
Step 2: Create Your Express Application
Create an index.js file and set up a basic Express server:
// index.js
require('dotenv').config(); // Load environment variables
const express = require('express');
const app = express();
const PORT = process.env.PORT || 3000;

app.use(express.json()); // Enable JSON body parsing

app.get('/', (req, res) => {
    res.send('Welcome to the JWT Node.js App!');
});

app.listen(PORT, () => {
    console.log(`Server running on port ${PORT}`);
});
Also, create a .env file in the root directory for your secret key:
// .env
JWT_SECRET=supersecretjwtkeythatshouldbemorecomplex
Important: Always use a strong, randomly generated secret key in a production environment.
Step 3: User Authentication and Token Generation
Let’s simulate user registration and login. We’ll need a simple user array (in a real app, this would be a database) and a way to hash/compare passwords.
// index.js (add these lines)
const jwt = require('jsonwebtoken');
const bcrypt = require('bcryptjs');

// A simple in-memory user store (for demonstration purposes)
const users = [];

// Register Route
app.post('/register', async (req, res) => {
    try {
        const { username, password } = req.body;
        if (users.find(u => u.username === username)) {
            return res.status(400).send('User already exists');
        }
        const hashedPassword = await bcrypt.hash(password, 10);
        const newUser = { id: Date.now(), username, password: hashedPassword };
        users.push(newUser);
        res.status(201).send('User registered successfully');
    } catch (error) {
        res.status(500).send('Error registering user');
    }
});

// Login Route
app.post('/login', async (req, res) => {
    try {
        const { username, password } = req.body;
        const user = users.find(u => u.username === username);
        if (!user) {
            return res.status(400).send('Invalid credentials');
        }

        const isMatch = await bcrypt.compare(password, user.password);
        if (!isMatch) {
            return res.status(400).send('Invalid credentials');
        }

        // Generate JWT
        const token = jwt.sign(
            { id: user.id, username: user.username },
            process.env.JWT_SECRET,
            { expiresIn: '1h' } // Token expires in 1 hour
        );

        res.json({ token });
    } catch (error) {
        res.status(500).send('Error logging in');
    }
});
After a successful login, the server responds with a JWT. The client should store this token (e.g., in local storage or a cookie) and include it in the authorization header of subsequent requests.
Step 4: Creating a JWT Verification Middleware
To protect your routes, you’ll need a middleware function that verifies the incoming JWT.
// authMiddleware.js (create a new file)
const jwt = require('jsonwebtoken');

function authenticateToken(req, res, next) {
    const authHeader = req.headers['authorization'];
    // Format: "Bearer TOKEN"
    const token = authHeader && authHeader.split(' ')[1];

    if (token == null) {
        return res.sendStatus(401); // No token provided
    }

    jwt.verify(token, process.env.JWT_SECRET, (err, user) => {
        if (err) {
            return res.sendStatus(403); // Token is invalid or expired
        }
        req.user = user; // Attach user payload to request
        next(); // Proceed to the next middleware/route handler
    });
}

module.exports = authenticateToken;
Step 5: Protecting Routes with Middleware
Now, let’s import and use our authenticateToken middleware to protect a sample route in index.js.
// index.js (add these lines)
const authenticateToken = require('./authMiddleware');

// Protected Route
app.get('/protected', authenticateToken, (req, res) => {
    res.json({ message: `Welcome ${req.user.username}! This is protected data.`, user: req.user });
});
Now, if you try to access /protected without a valid JWT in the Authorization header (Bearer <token>), you’ll receive a 401 or 403 status. With a valid token, you’ll get access to the data.
Best Practices for JWT Security
- Keep Your Secret Key Secure: Never hardcode it. Use environment variables (
.env) and ensure it’s a long, complex, random string. - Set Expiration Times: Always include an
expiresInoption when signing tokens to limit the window of opportunity for stolen tokens. Short-lived tokens are generally safer. - Use HTTPS: Always transmit tokens over secure HTTPS connections to prevent man-in-the-middle attacks.
- Don’t Store Sensitive Data in Payload: JWTs are signed, not encrypted. Anyone can read the payload. Only store non-sensitive user IDs or roles.
- Consider Refresh Tokens: For a better user experience with short-lived access tokens, implement a refresh token mechanism. Refresh tokens are long-lived, stored securely, and used only to request new access tokens.
- Revocation: While JWTs are stateless, you might need a mechanism for blacklisting tokens (e.g., on logout or compromise) if you use longer-lived tokens or refresh tokens.
Conclusion
Implementing JWT authentication in Node.js provides a robust and scalable solution for securing your APIs. By following this guide, you’ve learned how to generate, sign, and verify JSON Web Tokens, along with essential security best practices. Now you can build secure, production-ready Node.js applications with confidence.
Feel free to expand on this implementation by integrating a real database like MongoDB or PostgreSQL, and adding more sophisticated error handling and logging.
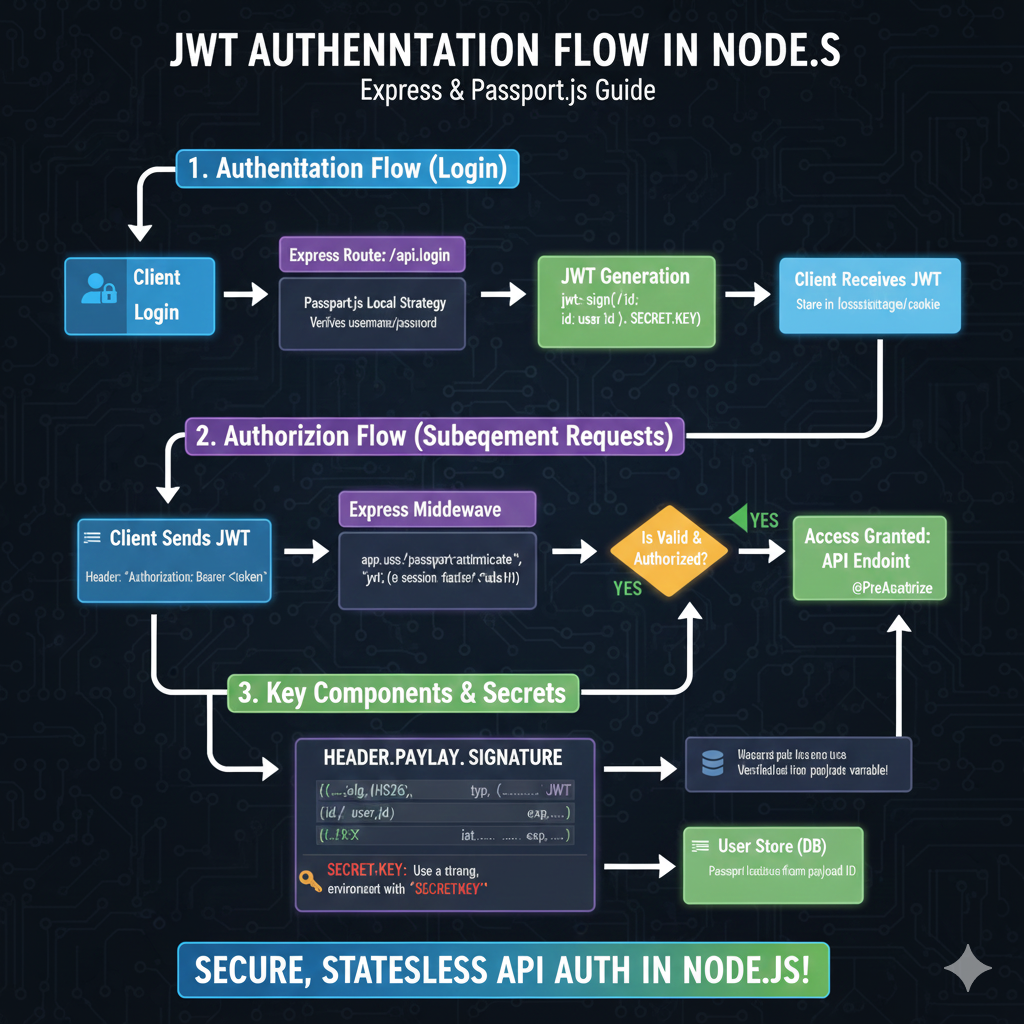
The image is an infographic titled “JWT AUTHENTICATION FLOW IN NODE.JS: Express & Passport.js Guide”. It details the three main stages of implementing JSON Web Token (JWT) based authentication in a Node.js environment, specifically using Express and the Passport.js library.
🔒 JWT Authentication Flow in Node.js
1. Authentication Flow (Login)
This section explains how a user initially logs in and receives a JWT:
- Client Login: The user sends credentials to the server.
- Express Route: The request hits the
/api/loginendpoint. - Passport.js Local Strategy: This component verifies the username and password.
- JWT Generation: Upon successful verification, a JWT is created using
jwt.sign(id, SECRET_KEY). - Client Receives JWT: The token is sent back to the client to be stored in local storage or a cookie.
2. Authorization Flow (Subsequent Requests)
This outlines how the client uses the JWT to access protected resources:
- Client Sends JWT: The client includes the token in the request header:
Authorization: Bearer <token>. - Express Middleware: The request is intercepted by Passport’s middleware (
passport.authenticate("jwt", {session: false})). - Is Valid & Authorized?: The token is validated.
- YES: Access is granted, and the request reaches the protected API endpoint (
@PreAuthorize).
- YES: Access is granted, and the request reaches the protected API endpoint (
3. Key Components & Secrets
This section breaks down the JWT structure and security considerations:
- Header.Payload.Signature: The structure is
alg: HS256,typ: JWT(Header), user details (id,user_id), and timestamps (iat,exp) (Payload). - SECRET KEY: It is emphasized to Use a strong environment variable for the
SECRETKEY. - User Store (DB): User details are fetched from the database using the payload ID after the token is verified.
learn for more knowledge
Json parser-> How to Find the Fastest JSON Parser for Peak Performance – json parse
Mykeywordrank-> Search Page Optimization: Maximizing Visibility and Clicks on the SERP (A Key to Your Site’s Success) – keyword rank checker
Json Compare ->Compare Two JSON Files Online Easily and Accurately – online json comparator
Fake Json –>Dummy API for JSON Data: Unlocking Efficient Development – fake api
Leave a Reply