Introduction to python jwt and auth
JSON Web Tokens (jwt) are a popular open standard (RFC 7519) used for securely transmitting information between parties as a JSON object. This information can be verified and trusted because it is digitally signed. In the python ecosystem, jwts are the backbone of modern auth (authentication and authorization) systems, providing a stateless way to manage tokens.
Whether you are building a microservice with FastAPI or a legacy web app, understanding how to sign and verify a token is essential for security.
Prerequisites for jwt in python
Before you start encoding or decoding tokens, ensure you have:
- python 3.6+ installed.
pip(the PyPI package installer).- An understanding of keys and signature algorithms.
Installing pyjwt
The most robust library on PyPI for this task is pyjwt. To support advanced key algorithms (like RSA or Ed2CDA), you should install the cryptography extension:
Bash
pip install pyjwt[cryptography]
Understanding the jwt Header, Payload, and Signature
A token consists of three parts separated by dots, representing the header payload and the signature:
- Header: Contains the algorithm used (like HS256 or RS256) and the type of token.
- Payload: This is where you store claims (data). You can use custom claims to pass user data or permissions.
- Signature: Created by taking the encoded header, encoded payload, and a key to sign the data.
How to Sign and Encode a python jwt
Encoding involves taking your claims and using a key (either a secret string or a public/private key pair) to create the token.
Using Symmetric Keys
Python
import jwt
import datetime

# Define your secret key and algorithm
key = "your-256-bit-secret"
algorithm = "HS256"

# Define custom claims
payload = {
    "sub": "1234567890",
    "name": "John Doe",
    "iat": datetime.datetime.utcnow(),
    "exp": datetime.datetime.utcnow() + datetime.timedelta(hours=24)
}

# Encode the token
token = jwt.encode(payload, key, algorithm=algorithm)
print(f"Generated Token: {token}")
Decoding and Verifying jwts
To decode a token, you must verify the signature to ensure the header payload hasn’t been tampered with.
Python
try:
    decoded_payload = jwt.decode(token, key, algorithms=[algorithm])
    print(decoded_payload)
except jwt.ExpiredSignatureError:
    print("Token expired.")
except jwt.InvalidTokenError:
    print("Invalid token.")
Advanced Key Management: Asymmetric Keys and JWKS
For high-security environments, such as those using FastAPI or OIDC, you often use public and private keys.
1. Using a Key PEM
You can load a key pem using cryptography hazmat primitives to sign tokens with RS256. This involves a private key for encoding and a key public for decoding.
2. Key Rotation and JWKS Endpoint
Modern auth servers use key rotation to improve security. Instead of hardcoding a key, your python app can fetch keys from a jwks endpoint. A jwks (JSON Web Key Set) allows your application to dynamically discover the public key needed to verify the signature.
Best Practices for python jwt Security
| Feature | Best Practice |
| Signature Algorithms | Use RS256 (asymmetric) for distributed systems or HS256 for internal apps. |
| Claims | Always include exp (expiration) and iss (issuer) claims. |
| Key Storage | Never store a private key in your code; use environment variables or a JWKS. |
| Sensitive Data | Never put passwords or PII in the payload, as it is only base64 encoded. |
Integration with FastAPI
FastAPI has built-in support for jwts, making it easy to create an OAuth2 flow. It utilizes pyjwt under the hood to handle the decoding and validation of tokens in the header.
Conclusion
Mastering python jwt implementation is a journey through encoding, decoding, and rigorous key management. By understanding how to manipulate the header, payload, and signature, and by leveraging advanced features like jwks and asymmetric keys, you can build highly secure python applications.
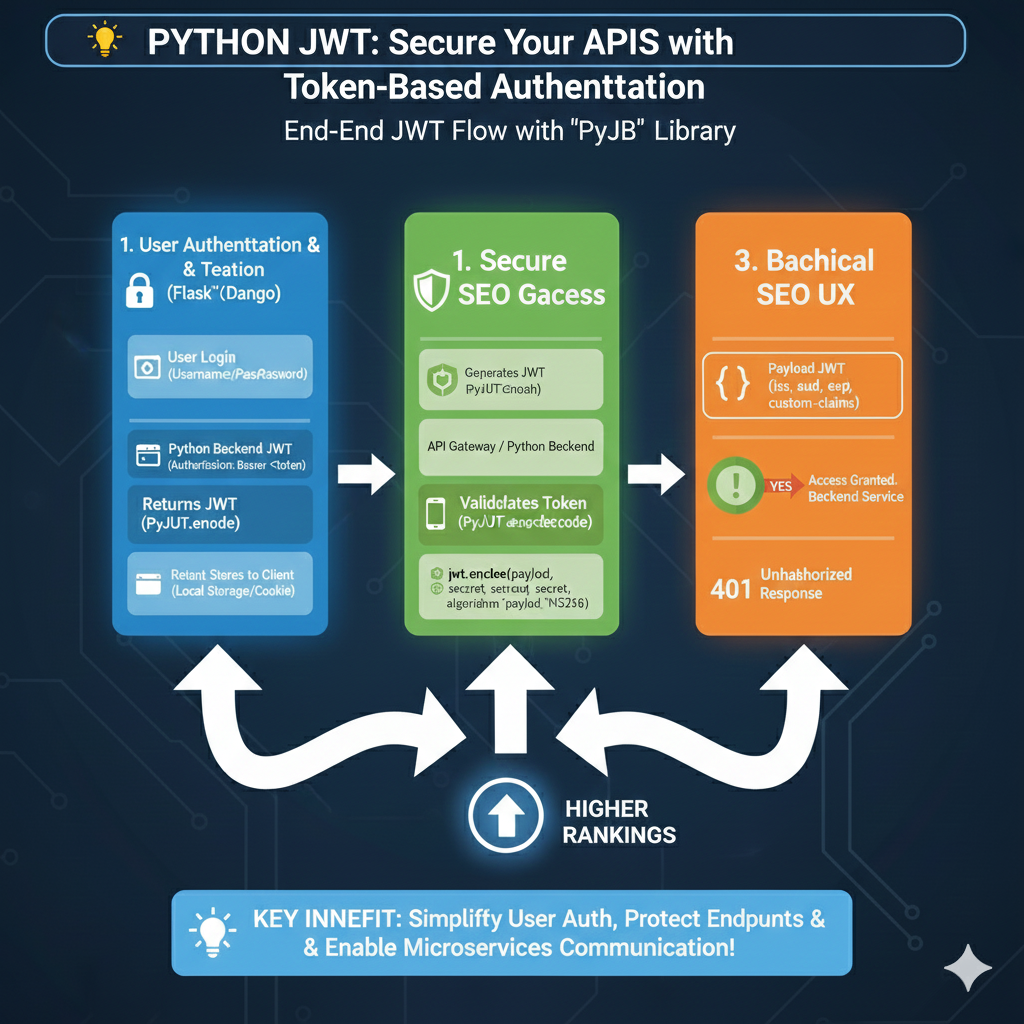
Python JWT Authentication Flow
The process is organized into three major phases to ensure secure communication between clients and backend services:
1. User Authentication & Token Generation (Blue)
This phase covers the initial identification of the user:
- User Login: The user provides credentials (Username/Password) through a Python-based web framework like Flask or Django.
- Backend Processing: The Python backend verifies the credentials and uses a library to generate a signed JWT (e.g.,
jwt.encode). - Token Delivery: The server returns the JWT to the client.
- Client Storage: The client securely stores the token in Local Storage or a Cookie for subsequent requests.
2. Secure API Access & Validation (Green)
This section explains how the token is used to protect active endpoints:
- Authorization Header: For every request, the client sends the token in the
Authorization: Bearer <token>header. - Token Decoding: The Python backend intercepts the request and validates the token using
jwt.decode(payload, secret, algorithm='HS256'). - Identity Verification: The system checks the signature and ensures the token has not been tampered with or expired.
3. Authorization Logic & Response (Orange)
The final phase determines the outcome of the request:
- Payload Inspection: The backend reads the JWT payload, which contains standard and custom claims such as
iss(issuer),sub(subject), andexp(expiration). - Access Granted: If valid, the user gains access to the protected backend service.
- Unauthorized (401) Response: If the token is missing, expired, or invalid, the server returns a 401 Unauthorized error.
learn for more knowledge
Json Parser-> How to Parse JSON in Go (golang json parser Tutorial) – json parse
Mykeywordrank-> SEO Ranking Checker: Maximizing Your Website Ranking Checker and SEO Ranking with SEOptimer – keyword rank checker
Json Compare ->How to Easily Compare Two JSON Online: A Comprehensive Guide – online json comparator
Fake Json –>What Is Dummy API JSON? (Beginner-Friendly Explanation) – fake api
Leave a Reply