Introduction to JSON Web Tokens (JWT) and OAuth 2.0
In today’s interconnected web, securing your APIs and user data is paramount. Two powerful standards often used together to achieve this are OAuth 2.0 and JSON Web Tokens (JWT). While OAuth 2.0 handles authorization, JWT provides a secure, self-contained way to transmit information between parties. This guide will walk you through how to integrate these two technologies to build a robust and scalable authentication and authorization system.
What is OAuth 2.0? The Authorization Flow
OAuth 2.0 (Open Authorization) is an industry-standard protocol for authorization. It allows a user to grant a third-party application (app) limited access to their resources on another service without sharing their credentials. It acts as an intermediary, delegating access rather than sharing passwords. This protocol defines a specific flow for granting access.
Key Roles in OAuth 2.0:
- Resource Owner: The user who owns the data and grants access (via consent and login).
- Client: The application requesting access.
- Authorization Server: The server that handles authentication and issues tokens after obtaining authorization. This is often referred to as the authentication server.
- Resource Server: The server that hosts the protected resources and accepts access tokens to grant access.
What is JWT (JSON Web Token)?
A JSON Web Token (JWT) is a compact, URL-safe means of representing claims to be transferred between two parties. The claims in a JWT (JWTS) are encoded as a JSON object that is digitally signed.
Structure of a JWT:
A JWT consists of three parts separated by dots: Header.Payload.Signature.
- Header: Specifies the algorithm (algorithm) used for signing.
- Payload: Contains the claims (identity) about the user and the granted permissions.
- Signature: Used to verify the sender of the JWT and ensure the message hasn’t been changed.
Why Combine OAuth 2.0 with JWT? (JWT Access Token)
While OAuth 2.0 is an authorization framework, it doesn’t specify the format of the access token. By using JWTs as OAuth 2.0 access tokens, you gain several advantages essential for modern API security:
- Statelessness: The server can validate the jwt access token purely by its signature and claims within it.
- Self-contained Information: JWTs can carry user information, roles, and permissions directly in the token, allowing resource servers to make jwt authorization decisions without database lookups.
- Decoupling: Authorization and resource servers become more independent.
- JWT Authentication and Authorization: The JWT provides both authentication (who the user is) and authorization (access) data instantly.
How to Implement OAuth 2.0 with JWT for Secure APIs
The general flow for using OAuth 2.0 with JWTs involves the following steps:
Implementation Flow:
- User Initiates Request: A user attempts to access a protected resource on your client application.
- Client Redirects to Authorization Server: The client app redirects the user’s browser to the Authorization Server’s login page.
- User Authenticates and Grants Access: The user performs login and grants the client application permission to access their resources (consent).
- Authorization Server Issues Authorization Code: The Authorization Server redirects the user back to the client application with an authorization code.
- Client Exchanges Code for JWT: The client sends the authorization code (along with its client ID and client secret) to the Authorization Server’s token endpoint. This exchange can also involve a jwt assertion or oauth assertion (such as Client Assertion) for enhanced security.
- Authorization Server Issues JWT (Access Token) and Refresh Token: The Authorization Server issues a JWT (as the access token) and often a refresh token.
- Client Uses JWT to Access Resource Server: The client application includes the JWT in the Authorization header of its requests to the Resource Server (e.g., Authorization: Bearer [JWT]).
- Resource Server Validates JWT: The Resource Server validates the JWT’s signature using the Authorization Server’s public key. It also checks the expiration (exp), issuer (iss), and audience (aud) claims to enforce jwt authorization.
Best Practices for OAuth 2.0 with JWT
Adherence to these practices ensures a high level of security for your API and application:
- Use HTTPS Everywhere: Always transmit tokens over secure HTTPS connections.
- Short-Lived Access Tokens: Keep jwt access tokens short-lived (e.g., 5-15 minutes).
- Use Refresh Tokens: Pair short-lived access tokens with longer-lived refresh tokens.
- Strong Key Management: Use strong secrets. For production, consider asymmetric algorithms (RS 256).
- Validate All Claims: Resource servers must rigorously validate all relevant claims on every incoming JWT.
- Avoid Storing Sensitive Data in JWT Payload: JWTs are encoded, not encrypted by default. Do not put highly sensitive, unencrypted data in the payload.
By carefully implementing the OAuth JWT combination and adhering to these best practices, you can build a highly secure, scalable, and efficient jwt authentication and authorization system for your APIs. This combination provides a robust framework for managing access to your valuable resources while enhancing the user experience.
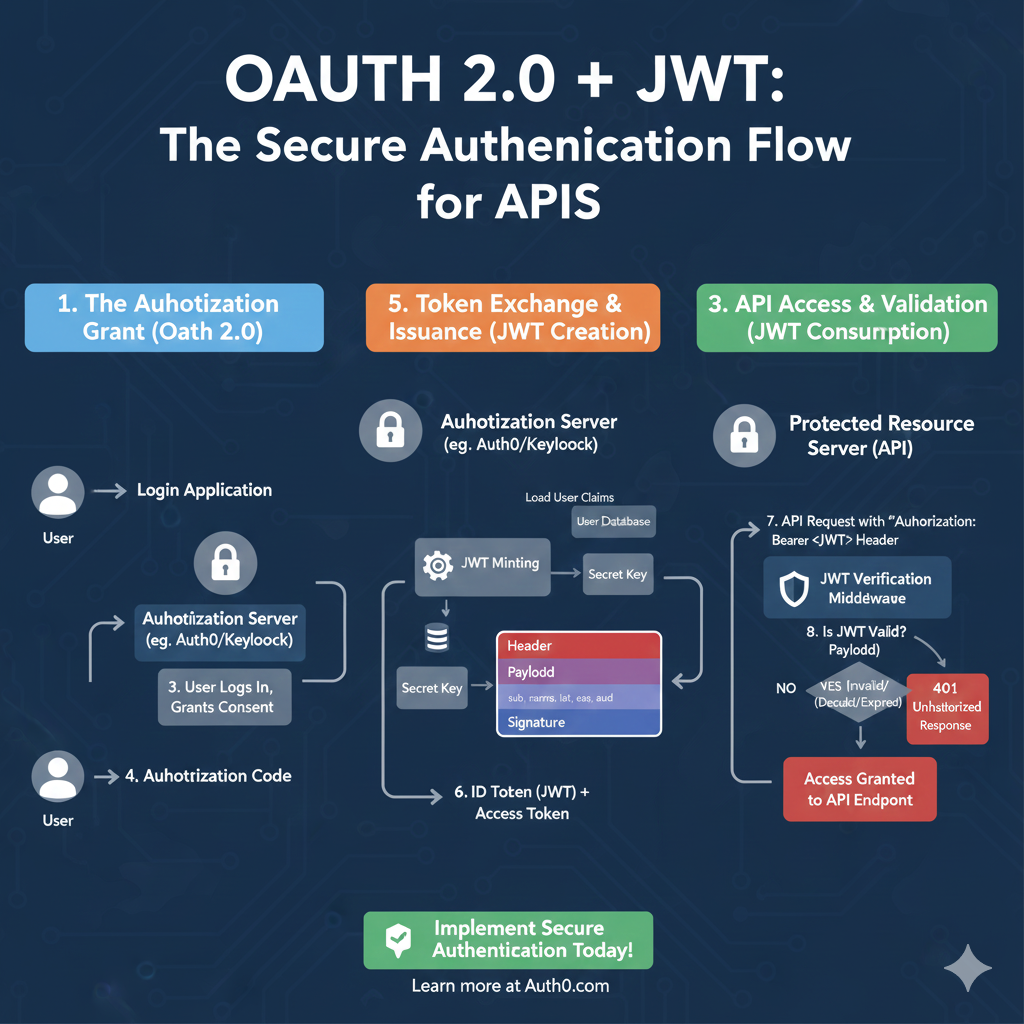
OAuth 2.0 + JWT Flow
This infographic details the secure authentication process, divided into three stages: Authorization, Token Issuance, and API Validation.
1. The Authorization Grant (OAuth 2.0) 🤝
This phase handles the user logging in and granting permission to the application.
- 1. Login Application: The User initiates a login request through the application.
- 2. Authorization Server: The application redirects the user to the Authorization Server (e.g., Auth0/Keycloak).
- 3. User Logs In, Grants Consent: The user successfully authenticates and approves the application’s access request.
- 4. Authorization Code: The Authorization Server sends a short-lived Authorization Code back to the Login Application.
2. Token Exchange & Issuance (JWT Creation) 🔑
This is the secure backend step where the Authorization Code is exchanged for the actual JWT and Access Token.
- Load User Claims: The Authorization Server loads the user data from the User Database.
- JWT Minting: The server uses the Secret Key to sign the token.
- JWT Structure: The token is created with the Header, Payload (containing claims like
sub,exp,aud), and the Signature. - 6. ID Token (JWT) + Access Token: The client receives the final ID Token (the JWT) and the Access Token.
3. API Access & Validation (JWT Consumption) ✅
This phase verifies the JWT when the client attempts to access a protected resource.
- 7. API Request: The client sends an API Request to the Protected Resource Server (API) with the token in the
Authorization: Bearer <JWT>Header. - JWT Verification Middleware: The server uses the same Secret Key to verify the token’s signature and claims.
- 8. Is JWT Valid?:
- Yes: If valid, the user is granted Access Granted to API Endpoint.
- No: If invalid (e.g., expired or tampered), the server returns a 401 Unauthorized Response.
learn for more knowledge
Json Parser ->What Is Node.js Body Parser? express body-parser (Explanation) – json parse
Mykeywordrank ->What Is Seo Rank and seo analyzer – keyword rank checker
Json Compare ->Online Compare JSON, JSON Compare, JSON Compare Tool, JSON Diff – online json comparator
Fake Json –>What is FakeStore API: Beginner-Friendly Guide to Using Fake E-Commerce Data – fake api
Leave a Reply