Blog

  • jwt header-The Complete Guide to json web token Metadata

    Introduction to json web tokens and Security

    JSON Web Tokens (jwts) have become an industry standard (rfc 7519) for securely transmitting information between parties as a JSON object. While the entire token is crucial, the jwt header, often overlooked, plays a fundamental role in jwt processing. Understanding the jwt structure is key to building an efficient api and safeguarding access.


    Understanding the JWT Structure and JOSE Header

    A jwt token is composed of three parts separated by dots (.): the header, the payload, and the signature. The header is technically referred to as the JOSE Header (JSON Object Signing and Encryption). It provides metadata about the signed jwt or encrypted jwt, primarily specifying the token type and the cryptographic algorithms used.

    Components of the JWT Header

    The header is a Base64Url encoded JSON object. When decoded, it typically contains:

    • alg (Algorithm): Specifies the cryptographic algorithm, such as sha-256 (HS256) or RS256.
    • typ (Type): Declares the token type, which is usually “JWT”.

    Note: An unsecured jwt may have the algorithm set to “none”, but this is a major security risk in production environments.


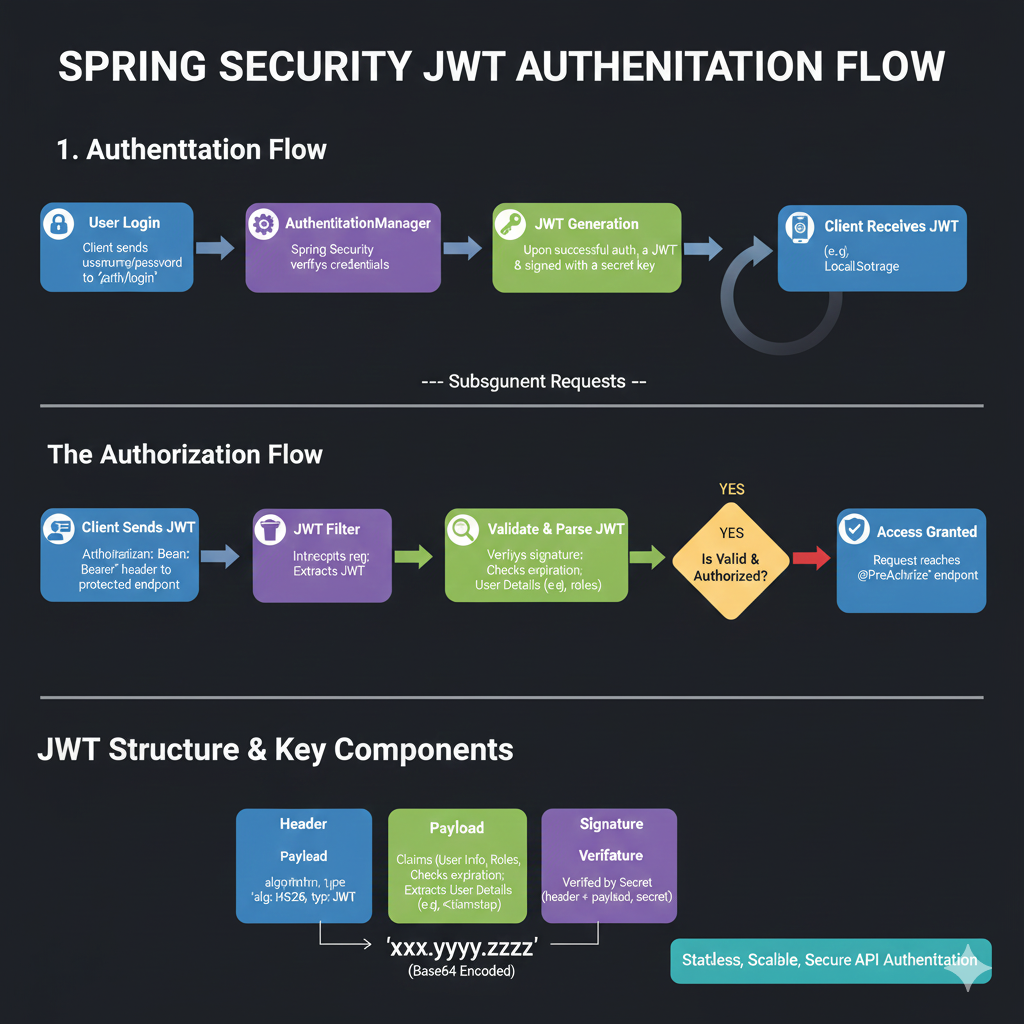
    How the Header Payload and Signature Work Together

    In the standard jwt structure, the header and payload are encoded separately and then combined to create the signature (often referred to as a jws or JSON Web Signature).

    1. Header: Defines the sha algorithm.
    2. Payload: Contains the claims (user data, permissions, etc.).
    3. Signature: Created by the server using a secret key to ensure the web token hasn’t been tampered with.

    When a client sends a request header, specifically an authorization header with a bearer token, the server immediately parses the jwt header to determine how to verify the rest of the token.


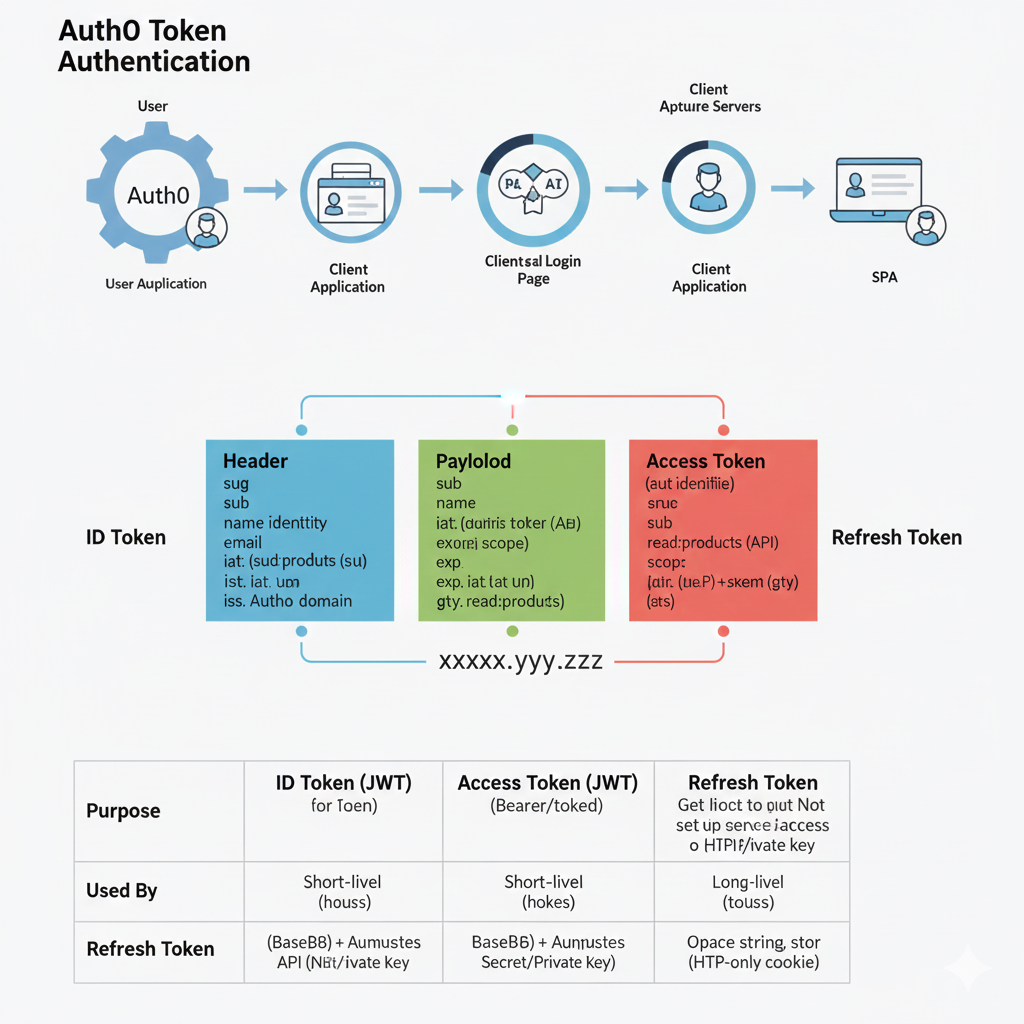
    JWT Processing in the Authorization Header

    For most oauth and api implementations, the jwt token is passed in the request header as follows:

    Authorization: Bearer <token>

    The server performs the following validation steps:

    • Algorithm Negotiation: It reads the alg field to know which key to use for the signature.
    • Type Verification: It confirms the token type matches expectations.
    • Integrity Check: It re-calculates the signature using the header payload and its own secret key.

    Best Practices for JWTs and Access Control

    To ensure robust security when working with json web tokens:

    • Never Trust the alg Blindly: Malicious users might change the algorithm to “none”. Always hardcode supported algorithms on your server.
    • Keep it Lean: The jwt header should only contain necessary metadata for jwt processing. Avoid placing sensitive claims here.
    • Use Strong Algorithms: Stick to sha-256 or higher (RS256/HS256) to ensure the signature cannot be easily cracked.
    • Validate the Issuer: Always check the iss claim in the payload alongside the header validation.

    Conclusion

    The jwt header is a small but mighty component of the json web token. By mastering its role within the jwt structure, developers can implement jwts more effectively, strengthening the authentication and authorization mechanisms of their applications. Whether you are building a simple api or a complex oauth identity provider, the header is your first line of defense.

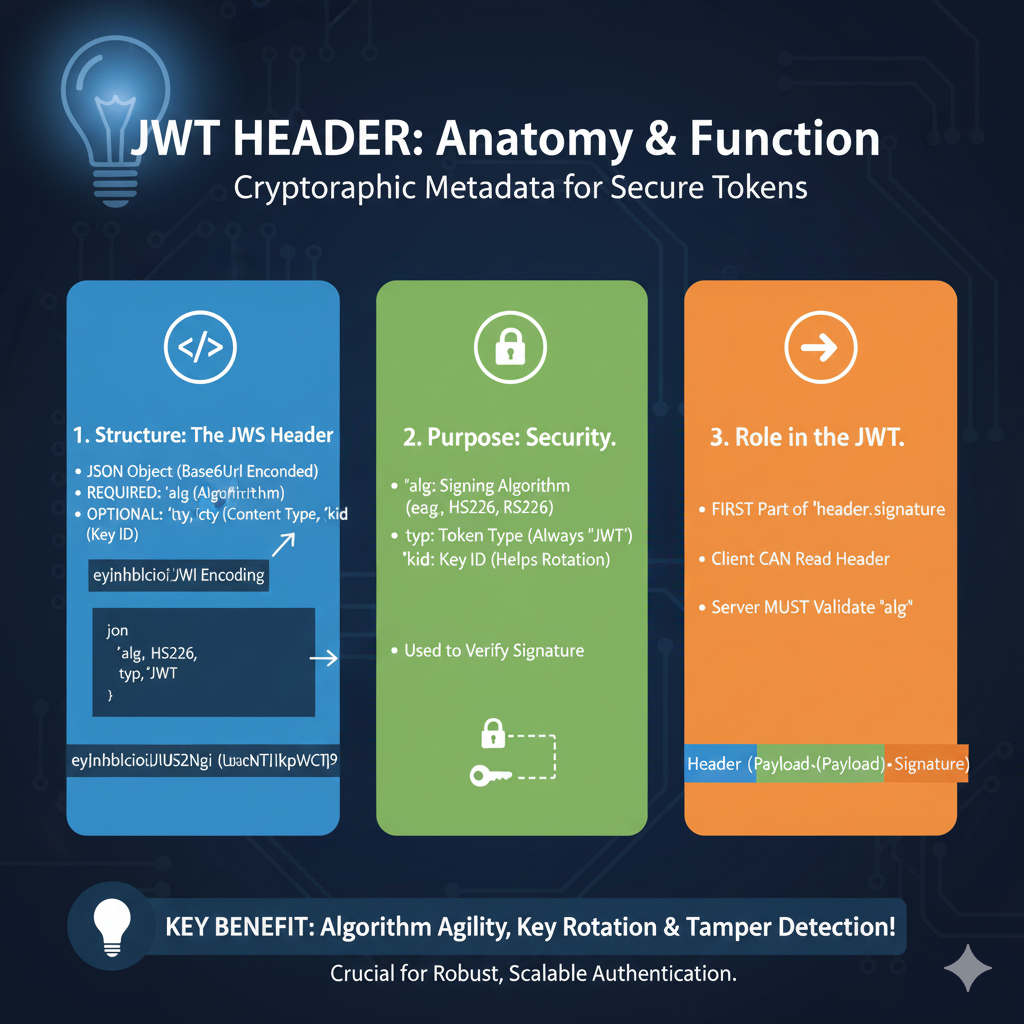
    The Three Pillars of a JWT Header

    The graphic illustrates how the header acts as the instruction manual for the rest of the token:

    1. Structure: The JWS Header (Blue)

    This section defines the physical makeup of the header:

    • Format: It is a JSON Object that is Base64Url encoded for transmission.
    • Required Fields: Every header must include the alg (Algorithm) field.
    • Optional Metadata: It can include fields like typ (Token Type), cty (Content Type), or kid (Key ID).
    • Example Encoding: Raw JSON such as {"alg": "HS256", "typ": "JWT"} is transformed into a URL-safe string like eyJhbGciOiJIUzI1NiJ9....

    2. Purpose: Security (Green)

    The header contains the specific parameters needed to verify the token’s authenticity:

    • Algorithm Specification: The alg claim defines which signing algorithm is used, such as symmetric HS256 or asymmetric RS256.
    • Key Identification: The kid field helps the server identify which specific key should be used for validation, which is vital for Key Rotation.
    • Signature Verification: This metadata is used directly by the server to verify the final signature of the JWT.

    3. Role in the JWT (Orange)

    This section explains how the header sits within the overall token structure:

    • The First Segment: The header is always the FIRST part of the dot-separated JWT string (header.payload.signature).
    • Client Transparency: While the client can read the header, it must not trust it until the signature is validated.
    • Server Responsibility: The server MUST validate the alg field to prevent “none” algorithm attacks or other tampering.

    learn for more knowledge

    Mykeywordrank-> small seo tool for keyword rank checking and local rank checker – keyword rank checker

    json parser-> How to Parse JSON in C with jsmn parser: A Step-by-Step Guide for SEO – json parse

    Json Compare ->JSON File Compare Online: The Ultimate JSON Compare Online and JSON Diff Guide for Files – online json comparator

    Fake Json –>How to Easily Get dummy json data api Your API Testing and Development – fake api

  • Mastering OAuth2 JWT and OAuth Authentication Introduction to OAuth2 JWT and Identity Security

    In the evolving landscape of web and mobile applications, secure and efficient authentication and authorization mechanisms are paramount. OAuth2 provides a robust framework for delegated authorization, while a JSON Web Token (JWT) offers a compact, URL-safe means of representing claims. When combined, oauth authentication and jwt create a powerful, stateless, and scalable solution for securing your api and application.

    By using a web token for identity verification, you can eliminate the need for server-side session storage, significantly improving the scalability of your resource server.


    Understanding the JWT Bearer Flow and Access Token Before diving into the configuration, let’s clarify the authorization flows and how jwt tokens facilitate communication.

    Roles in OAuth2 JWT

    • Resource Owner: The user who owns the data.
    • Client Application: The application requesting access.
    • Authorization Server: The authentication server that issues the oauth token.
    • Resource Server: The api hosting the resource, which validates the access token.

    JSON Web Token Structure

    A json web token consists of three parts that form the bearer flow security:

    1. Header: Metadata about the token type and algorithm.
    2. Payload: Contains claims about the user identity.
    3. Signature: Ensures the web token hasn’t been tampered with.

    Implementing JSON Web Security: A Step-by-Step Guide

    Step 1: Client Registration and Configuration

    Your client application must be registered with the authorization server. This setup provides the credentials needed to initiate authentication oauth requests.

    Step 2: Requesting an Authorization Grant

    The client redirects the user to the authentication server. In modern spring or Node.js environments, this is the starting point of the flow.

    Step 3: Obtaining the Access Token (JWT)

    The client exchanges the grant for an access token. The authentication server responds with a json web token that serves as the jwt bearer.

    JSON

    {
        "access_token": "eyJhbGciOiJIUzI1Ni...",
        "token_type": "Bearer",
        "expires_in": 3600
    }
    

    Step 4: Using the JWT Bearer on the Resource Server

    The client application sends the access token in the HTTP header. The resource server validates the jwt tokens without needing a session lookup, enabling a truly stateless api.


    Best Practices for OAuth2 JWT and Access Control

    To maintain high security in your oauth2 setup:

    • Use Short-lived Tokens: Minimize the life of an access token.
    • Validate All Claims: Ensure the resource server checks the iss and exp claims in every web token.
    • Secure the Authorization Server: Your authentication server should be the only entity capable of signing tokens.
    • Framework Support: If you are using Spring, leverage Spring Security for easier configuration of resource protection.

    Conclusion

    Implementing oauth2 jwt offers a modern way to handle authentication and authorization flows. By understanding the bearer flow and effectively managing your access token, you can build a secure identity layer for any application. Adhering to these json web token standards ensures your api remains robust and scalable.

    The Unified Security Workflow

    The process is divided into three major phases that combine delegated authorization with stateless token-based authentication.

    1. Authorization & Token Issuance (Blue)

    This phase establishes trust and issues the initial credentials:

    • Authorization Request: The client application requests access to resources on behalf of the user from the Authorization Server.
    • User Consent: The user authenticates with the provider (e.g., Google or GitHub) and grants specific permissions (scopes) to the client.
    • JWT Generation: Upon successful consent, the server generates a signed JWT Access Token containing user claims, roles, and expiration data.
    • Payload Structure: The issued token typically includes three parts: a Header (algorithm), Payload (user data/claims like sub and exp), and a Signature (integrity check).

    2. Stateless API Communication (Green)

    This section covers how the client utilizes the issued token for repeated access:

    • Bearer Token Header: The client attaches the JWT to every API request using the Authorization: Bearer <token> header.
    • Independent Verification: The Resource Server (API) validates the token’s signature using a shared secret or public key without needing to call the Authorization Server again.
    • Stateless Validation: Because the JWT is self-contained, the server extracts all necessary user info and permissions directly from the token, eliminating database lookups for session data.

    3. Secure Resource Access (Orange)

    The final stage determines the outcome of the request based on the token’s validity:

    • Access Granted: If the token is valid and contains the required scopes, the Resource Server returns the protected data (e.g., a user profile or private files).
    • Access Denied: If the token has expired, been tampered with, or lacks the necessary permissions, the server returns a 401 Unauthorized or 403 Forbidden error.
    • Token Refresh: For long-term sessions, a Refresh Token can be used to obtain a new Access Token once the current one expires, maintaining a seamless user experience.

    🚀 Key Security Benefits

    • Scalability: Perfect for microservices as each service can verify tokens independently.
    • Reduced Server Load: Eliminates the need for centralized session storage (like Redis or DB lookups).
    • Delegated Access: Users never share their actual passwords with the third-party client application.

    learn for more knowledge

    Mykeywordrank-> small seo tool for keyword rank checking and local rank checker – keyword rank checker

    Json Parser->Jackson JSON Parser: A Comprehensive Guide to Parse JSON for Java Developers – json parse

    Json Compare ->How to Effectively Use a JSON Comparator Online: Your Ultimate Guide to JSON Compare, and JSON Diff – online json comparator

    Fake Json –>How to Generate and Use Dummy JSON Data for Development and Testing – fake api

  • How to Implement jwt node js Authentication – A Step-by-Step Guide

    How to Implement JWT Authentication in Node.js: A Step-by-Step Guide

    JSON Web Tokens (JWT) have become a standard for securing APIs and managing user authentication in modern web applications. If you’re building a Node.js application and want to implement a robust and stateless authentication mechanism, JWT is an excellent choice. This guide will walk you through the process of integrating JWT into your Node.js application using Express.js.

    What is JWT?

    JWT is an open standard (RFC 7519) that defines a compact and self-contained way for securely transmitting information between parties as a JSON object. This information can be verified and trusted because it is digitally signed.

    • Compact: JWTs are small and can be sent through URL, POST parameter, or inside an HTTP header.
    • Self-contained: The payload contains all the necessary user information, reducing the need to query the database multiple times.
    • Secure: Signed with a secret (or a public/private key pair) to ensure authenticity and integrity.

    Prerequisites

    • Node.js installed (LTS version recommended).
    • npm (Node Package Manager) installed.
    • Basic understanding of JavaScript and Express.js.

    Step 1: Project Setup and Dependencies

    First, let’s create a new Node.js project and install the necessary packages:

    mkdir jwt-node-app
    cd jwt-node-app
    npm init -y
    npm install express jsonwebtoken dotenv bcryptjs
    • express: For building our web server.
    • jsonwebtoken: For creating and verifying JWTs.
    • dotenv: To manage environment variables (e.g., our JWT secret).
    • bcryptjs: For hashing user passwords (crucial for security).

    Step 2: Configure Environment Variables

    Create a .env file in your project root to store your JWT secret key. This secret should be strong and kept private.

    JWT_SECRET=your_super_secret_jwt_key_here
    PORT=3000

    Step 3: Create Your Express Application (server.js)

    Now, let’s set up a basic Express server in server.js.

    const express = require('express');
    const jwt = require('jsonwebtoken');
    const bcrypt = require('bcryptjs');
    require('dotenv').config();
    
    const app = express();
    app.use(express.json()); // For parsing JSON request bodies
    
    const users = []; // In-memory user store for demonstration. In a real app, use a database.
    
    // User Registration
    app.post('/register', async (req, res) => {
        try {
            const { username, password } = req.body;
            if (!username || !password) {
                return res.status(400).send('Username and password are required');
            }
    
            const hashedPassword = await bcrypt.hash(password, 10);
            const newUser = { id: users.length + 1, username, password: hashedPassword };
            users.push(newUser);
            res.status(201).send('User registered successfully');
        } catch (error) {
            res.status(500).send('Error registering user');
        }
    });
    
    // User Login & JWT Generation
    app.post('/login', async (req, res) => {
        const { username, password } = req.body;
        const user = users.find(u => u.username === username);
    
        if (!user) {
            return res.status(400).send('Invalid credentials');
        }
    
        const isMatch = await bcrypt.compare(password, user.password);
        if (!isMatch) {
            return res.status(400).send('Invalid credentials');
        }
    
        // Generate JWT
        const token = jwt.sign(
            { id: user.id, username: user.username },
            process.env.JWT_SECRET,
            { expiresIn: '1h' } // Token expires in 1 hour
        );
    
        res.json({ token });
    });
    
    // Middleware to verify JWT
    const authenticateToken = (req, res, next) => {
        const authHeader = req.headers['authorization'];
        const token = authHeader && authHeader.split(' ')[1]; // Bearer TOKEN
    
        if (token == null) return res.sendStatus(401); // No token, unauthorized
    
        jwt.verify(token, process.env.JWT_SECRET, (err, user) => {
            if (err) return res.sendStatus(403); // Token invalid/expired
            req.user = user; // Attach user payload to request
            next();
        });
    };
    
    // Protected Route
    app.get('/protected', authenticateToken, (req, res) => {
        res.json({ message: 'This is a protected route!', user: req.user });
    });
    
    const PORT = process.env.PORT || 3000;
    app.listen(PORT, () => {
        console.log(`Server running on port ${PORT}`);
    });

    Step 4: Testing Your API

    You can use tools like Postman or Insomnia to test your endpoints.

    • Register a user:
      POST /register
      Body (JSON): { "username": "testuser", "password": "password123" }
    • Login and get a token:
      POST /login
      Body (JSON): { "username": "testuser", "password": "password123" }
      This will return a JWT.
    • Access the protected route:
      GET /protected
      Headers: Authorization: Bearer YOUR_JWT_TOKEN_HERE
      If the token is valid, you’ll get access to the resource.

    Security Best Practices for JWT

    • Keep your Secret Key Private: Never expose your JWT_SECRET. Use environment variables.
    • Token Expiration: Always set an expiration time (expiresIn) for your tokens to limit the window of vulnerability if a token is compromised.
    • Use HTTPS: Ensure all communication is over HTTPS to prevent man-in-the-middle attacks from intercepting tokens.
    • Store Tokens Securely: On the client-side, store tokens in HttpOnly cookies or local storage with caution. HttpOnly cookies are generally safer against XSS attacks.
    • Refresh Tokens: For better user experience and security, implement a refresh token mechanism where short-lived access tokens are issued with longer-lived refresh tokens.
    • Don’t Put Sensitive Data in Payload: JWTs are base64 encoded, not encrypted. Sensitive information should not be placed directly in the token payload.

    Conclusion

    Implementing JWT authentication in your Node.js application provides a stateless, scalable, and secure way to manage user sessions. By following this guide, you’ve learned how to set up your project, create user registration and login endpoints, generate and verify JWTs, and secure protected routes. Remember to always adhere to security best practices to protect your application and users.

    Node.js JWT Authentication Roadmap

    The workflow is categorized into three critical phases to ensure a robust security model for microservices and APIs:

    1. Sign In & Issue Token (Blue)

    The first phase handles the initial identity verification and token creation:

    • User Login: The user sends their credentials (email and password) to the /api/login endpoint.
    • Token Signing: The server uses the jwt.sign() method, incorporating a secret key and a payload (like the user ID) to generate a unique token.
    • Delivery: The server sends the JWT back to the client, typically stored in an HTTP Only Cookie or Local Storage for security.

    2. Secure API Access (Green)

    This phase covers how the client uses the token for subsequent requests:

    • Authorization Header: The client sends the stored JWT in the header of every request as a Bearer <token>.
    • Middleware Verification: Node.js uses middleware to intercept the request and run jwt.verify() using the same secret key.
    • Validation Check: The system verifies if the token is authentic and has not expired before allowing the request to proceed.

    3. Protected Resources (Orange)

    The final phase determines the server’s response based on the token’s validity:

    • Access Granted: If the token is valid, the request is passed to the next route handler, returning a 200 OK and the requested user data.
    • Access Denied: If the token is missing or tampered with, the server triggers an error handler.
    • 401 Unauthorized: An invalid or expired token results in a 401 Unauthorized response, blocking access to the resource.

    learn for more knowledge

    Json Parser->Jackson JSON Parser: A Comprehensive Guide to Parse JSON for Java Developers – json parse

    Mykeywordrank->small seo tool for keyword rank checking and local rank checker – keyword rank checker

    Json Compare ->How to Effectively Use a JSON Comparator Online: Your Ultimate Guide to JSON Compare, and JSON Diff – online json comparator

    Fake Json –>How to Generate and Use Dummy JSON Data for Development and Testing – fake api

  • python jwt: How to Securely Implement jwt in python

    Introduction to python jwt and auth

    JSON Web Tokens (jwt) are a popular open standard (RFC 7519) used for securely transmitting information between parties as a JSON object. This information can be verified and trusted because it is digitally signed. In the python ecosystem, jwts are the backbone of modern auth (authentication and authorization) systems, providing a stateless way to manage tokens.

    Whether you are building a microservice with FastAPI or a legacy web app, understanding how to sign and verify a token is essential for security.


    Prerequisites for jwt in python

    Before you start encoding or decoding tokens, ensure you have:

    • python 3.6+ installed.
    • pip (the PyPI package installer).
    • An understanding of keys and signature algorithms.

    Installing pyjwt

    The most robust library on PyPI for this task is pyjwt. To support advanced key algorithms (like RSA or Ed2CDA), you should install the cryptography extension:

    Bash

    pip install pyjwt[cryptography]
    

    Understanding the jwt Header, Payload, and Signature

    A token consists of three parts separated by dots, representing the header payload and the signature:

    1. Header: Contains the algorithm used (like HS256 or RS256) and the type of token.
    2. Payload: This is where you store claims (data). You can use custom claims to pass user data or permissions.
    3. Signature: Created by taking the encoded header, encoded payload, and a key to sign the data.

    How to Sign and Encode a python jwt

    Encoding involves taking your claims and using a key (either a secret string or a public/private key pair) to create the token.

    Using Symmetric Keys

    Python

    import jwt
    import datetime
    
    # Define your secret key and algorithm
    key = "your-256-bit-secret"
    algorithm = "HS256"
    
    # Define custom claims
    payload = {
        "sub": "1234567890",
        "name": "John Doe",
        "iat": datetime.datetime.utcnow(),
        "exp": datetime.datetime.utcnow() + datetime.timedelta(hours=24)
    }
    
    # Encode the token
    token = jwt.encode(payload, key, algorithm=algorithm)
    print(f"Generated Token: {token}")
    

    Decoding and Verifying jwts

    To decode a token, you must verify the signature to ensure the header payload hasn’t been tampered with.

    Python

    try:
        decoded_payload = jwt.decode(token, key, algorithms=[algorithm])
        print(decoded_payload)
    except jwt.ExpiredSignatureError:
        print("Token expired.")
    except jwt.InvalidTokenError:
        print("Invalid token.")
    

    Advanced Key Management: Asymmetric Keys and JWKS

    For high-security environments, such as those using FastAPI or OIDC, you often use public and private keys.

    1. Using a Key PEM

    You can load a key pem using cryptography hazmat primitives to sign tokens with RS256. This involves a private key for encoding and a key public for decoding.

    2. Key Rotation and JWKS Endpoint

    Modern auth servers use key rotation to improve security. Instead of hardcoding a key, your python app can fetch keys from a jwks endpoint. A jwks (JSON Web Key Set) allows your application to dynamically discover the public key needed to verify the signature.


    Best Practices for python jwt Security

    FeatureBest Practice
    Signature AlgorithmsUse RS256 (asymmetric) for distributed systems or HS256 for internal apps.
    ClaimsAlways include exp (expiration) and iss (issuer) claims.
    Key StorageNever store a private key in your code; use environment variables or a JWKS.
    Sensitive DataNever put passwords or PII in the payload, as it is only base64 encoded.

    Integration with FastAPI

    FastAPI has built-in support for jwts, making it easy to create an OAuth2 flow. It utilizes pyjwt under the hood to handle the decoding and validation of tokens in the header.


    Conclusion

    Mastering python jwt implementation is a journey through encoding, decoding, and rigorous key management. By understanding how to manipulate the header, payload, and signature, and by leveraging advanced features like jwks and asymmetric keys, you can build highly secure python applications.

    Python JWT Authentication Flow

    The process is organized into three major phases to ensure secure communication between clients and backend services:

    1. User Authentication & Token Generation (Blue)

    This phase covers the initial identification of the user:

    • User Login: The user provides credentials (Username/Password) through a Python-based web framework like Flask or Django.
    • Backend Processing: The Python backend verifies the credentials and uses a library to generate a signed JWT (e.g., jwt.encode).
    • Token Delivery: The server returns the JWT to the client.
    • Client Storage: The client securely stores the token in Local Storage or a Cookie for subsequent requests.

    2. Secure API Access & Validation (Green)

    This section explains how the token is used to protect active endpoints:

    • Authorization Header: For every request, the client sends the token in the Authorization: Bearer <token> header.
    • Token Decoding: The Python backend intercepts the request and validates the token using jwt.decode(payload, secret, algorithm='HS256').
    • Identity Verification: The system checks the signature and ensures the token has not been tampered with or expired.

    3. Authorization Logic & Response (Orange)

    The final phase determines the outcome of the request:

    • Payload Inspection: The backend reads the JWT payload, which contains standard and custom claims such as iss (issuer), sub (subject), and exp (expiration).
    • Access Granted: If valid, the user gains access to the protected backend service.
    • Unauthorized (401) Response: If the token is missing, expired, or invalid, the server returns a 401 Unauthorized error.

    learn for more knowledge

    Json Parser-> How to Parse JSON in Go (golang json parser Tutorial) – json parse

    Mykeywordrank-> SEO Ranking Checker: Maximizing Your Website Ranking Checker and SEO Ranking with SEOptimer – keyword rank checker

    Json Compare ->How to Easily Compare Two JSON Online: A Comprehensive Guide – online json comparator

    Fake Json –>What Is Dummy API JSON? (Beginner-Friendly Explanation) – fake api

  • How to Securely Implement and Validate aws jwt and jwt

    Introduction: The Role of jwt authentication in aws

    In today’s cloud-native world, securing your api and web applications is paramount. A json web token (jwt) has emerged as a powerful, compact, and self-contained way to transmit identity information securely between parties. When leveraging an aws jwt within the Amazon Web Services ecosystem, understanding the right service patterns is crucial. This guide will walk you through how to effectively create, use, and verify a jwt token to enhance your application’s security posture.


    What Exactly is a json web token (jwt)?

    A json web token is an open standard (RFC 7519) that defines a compact and URL-safe way for securely transmitting information. This jwt token can be verified and trusted because it is digitally signed. Every jwt consists of three parts:

    • Header: Contains the type of token and the signing algorithm.
    • Payload: Contains the claims—statements about a user and additional data. Standard claims ensure a valid payload is transmitted (e.g., iss, exp, sub).
    • Signature: Created using a jwk (JSON Web Key) or secret to ensure the payload hasn’t been tampered with.

    Why Use jwt token Integration with aws?

    Integrating jwt authentication into your aws architecture offers several compelling advantages:

    • Stateless Authentication: An access token carries all necessary user info, reducing server-side session storage.
    • Decoupled Security: Frontends and microservices use the same jwt, issued by a central identity provider like a Cognito user pool.
    • Fine-Grained Access: Claims within a jwt allow an aws service to make authorization decisions.

    Key aws Services for jwt Integration

    Several aws services play a vital role when you create and verify tokens:

    • AWS Cognito: Acts as the primary identity provider. It uses a user pool to issue an access token or ID token.
    • Amazon API Gateway: The gateway for exposing your api. It can directly verify a jwt using built-in authorizers.
    • AWS Lambda: Used for custom jwt authentication logic. An aws lambda function can serve as a jwt verifier to process complex claims.

    How to verify and Validate aws jwt in api gateway

    The most common way to validate a jwt token is through the api gateway‘s built-in authorizer.

    1. Using a Cognito user pool authorizer

    If your tokens are issued by a Cognito user pool, the gateway provides direct integration. It will automatically check the signature against the jwks (JSON Web Key Set) to ensure a valid request.

    2. Using an OIDC authorizer

    For a jwt issued by other providers, you can use the jwt type authorizer. Provide the “Issuer URL” and “Audience” to allow the gateway to verify the token signature against the provider’s jwks endpoint.

    3. Advanced Validation with aws lambda and jwt verifier

    When you need custom logic, use an aws lambda function. You can use the aws-jwt-verify library to create a sophisticated jwt verifier.

    JavaScript

    // Example using a Lambda JWT Verifier
    const { CognitoJwtVerifier } = require("aws-jwt-verify");
    
    // cognitojwtverifier create: highly efficient with jwks cache
    const verifier = CognitoJwtVerifier.create({
      userPoolId: "us-east-1_example",
      tokenUse: "access",
      clientId: "example-client-id",
    });
    
    exports.handler = async (event) => {
      const token = event.headers.authorization;
      
      try {
        // jwtverifier create logic handles the verify process
        const payload = await verifier.verify(token); 
        console.log("Token is valid. Payload:", payload);
        return { isAuthorized: true, context: { user: payload.sub } };
      } catch {
        console.log("Token invalid");
        return { isAuthorized: false };
      }
    };
    

    Using cognitojwtverifier create is a best practice because it manages the jwks cache automatically, meaning your lambda doesn’t have to fetch the jwk on every single request, significantly improving api performance.


    Best Practices for aws jwt Security

    • Always verify Tokens: Never trust a jwt without checking the signature and valid payload.
    • Use jwks cache: When using aws lambda, ensure your jwt verifier uses a jwks cache to avoid unnecessary network calls to the identity provider.
    • Secure jwk Management: Ensure your jwks endpoint is trusted and use aws tools to rotate keys.
    • Short-Lived access token: Use short expiration times to minimize the risk of a compromised jwt token.

    Conclusion

    Mastering aws jwt integration provides a robust and scalable approach to securing your api. By leveraging a Cognito user pool for identity, api gateway for efficient jwt authentication, and aws lambda for custom jwt verifier scenarios, you can build a highly secure service. Implement these strategies today to ensure every access token is valid and your cloud-native applications remain protected.

    AWS JWT Authentication Strategy

    The process is divided into three critical phases: user entry, runtime security, and structural management.

    1. User Authentication & Token Generation

    This stage focuses on how a user initially identifies themselves to the AWS environment:

    • Initial Login: A user submits credentials (Username/Password) to start the session.
    • Identity Providers: AWS integrates with various Amazon Providers, including Social logins, SAML, or OIDC.
    • OAuth 2.0 Flow: The system processes authentication and scopes via an OAuth 2.0 / OIDC flow.
    • Token Delivery: Upon successful verification, AWS returns a set of JWTs, including ID, Access, and Refresh tokens.
    • Client Storage: The client application safely stores these tokens in Local Storage or a Cookie for future requests.

    2. Secure API Access (Runtime)

    This phase explains how the tokens are used to protect backend resources during active use:

    • Authorized Request: The client sends the JWT in the Authorization: Bearer <token> header.
    • API Gateway Interception: The request is received by the AWS API Gateway.
    • JWT Authorizer: A dedicated validator checks the token’s Signature, Issuer, Audience, and Expiration (exp).
    • Access Decision:
      • YES: Access is granted to backend services like AWS Lambda or EC2.
      • NO: The request is rejected if the token is invalid or unauthorized.

    3. JWT Structure & Key Management

    This section covers the technical makeup of the token and how AWS maintains security without manual keys:

    • Standard Structure: The token includes a Header (alg, typ), a Payload (claims like iss, aud, exp), and a Signature.
    • AWS KMS / Cognito Public Keys: AWS manages the public keys used by the API Gateway to verify token signatures.
    • Code Security: A major advantage is that there is NO SECRET KEY required within your application code.

    learn for more knowledge

    Json parser-> How to Parse JSON in Go (Golang JSON Parser Tutorial) – json parse

    Mykeywordrank-> Keyword SEO-Master Keyword Research and Discover the Best SEO Keywords with a Free Keyword Tool – keyword rank checker

    Json Compare ->How to Compare Two JSONs Online: Your Ultimate Guide – online json comparator

    Fake Json –>How to Create Dummy API Responses for Seamless Development and Testing – fake api

  • How to Implement node jwt Authentication in Node.js Applications

    Introduction to JWT and Node.js Authentication

    JSON Web Tokens (JWT) have become a standard for securing APIs and single-page applications. They provide a compact, URL-safe means of representing claims to be transferred between two parties. In the context of Node.js, JWT offers a robust way to handle user authentication and authorization without the need for server-side sessions. This guide will walk you through the process of integrating JWT into your Node.js applications, enhancing their security and scalability.

    What is a JSON Web Token (JWT)?

    A JWT consists of three parts separated by dots (.): a header, a payload, and a signature.

    • Header: Typically consists of two parts: the type of the token (JWT) and the signing algorithm used (e.g., HMAC SHA256 or RSA).
    • Payload: Contains the claims. Claims are statements about an entity (typically, the user) and additional data. Standard claims include iss (issuer), exp (expiration time), sub (subject), etc. You can also include custom claims.
    • Signature: Used to verify the sender of the JWT and to ensure that the message hasn’t been changed along the way. It’s created by taking the encoded header, the encoded payload, a secret, and the algorithm specified in the header.

    The beauty of JWT is that once signed, the token can be trusted by the server as long as the secret key remains private.

    Prerequisites

    Before diving into the implementation, ensure you have:

    • Node.js and npm installed on your system.
    • Basic understanding of Node.js and Express.js.
    • A code editor (e.g., VS Code).

    Step-by-Step Implementation: Node.js JWT

    1. Set Up Your Node.js Project

    First, create a new project directory and initialize a Node.js project.

    mkdir node-jwt-auth
    cd node-jwt-auth
    npm init -y

    2. Install Required Packages

    We’ll need express for our web server, jsonwebtoken to work with JWTs, and dotenv to manage environment variables for our secret key.

    npm install express jsonwebtoken dotenv

    3. Configure Environment Variables

    Create a .env file in your project root to store your JWT secret key. This is crucial for security.

    JWT_SECRET=YOUR_VERY_STRONG_SECRET_KEY

    Replace YOUR_VERY_STRONG_SECRET_KEY with a long, random string.

    4. Create Your Express Application

    Create an app.js (or server.js) file.

    // app.js
    require('dotenv').config();
    const express = require('express');
    const jwt = require('jsonwebtoken');
    
    const app = express();
    app.use(express.json()); // Enable JSON body parsing
    
    const PORT = process.env.PORT || 3000;
    const JWT_SECRET = process.env.JWT_SECRET;
    
    if (!JWT_SECRET) {
      console.error('JWT_SECRET not defined in .env file!');
      process.exit(1);
    }
    
    // Simple users (for demonstration)
    const users = [
      { id: 1, username: 'user1', password: 'password1' },
      { id: 2, username: 'user2', password: 'password2' }
    ];
    
    // Start the server
    app.listen(PORT, () => {
      console.log(`Server running on port ${PORT}`);
    });

    5. Implement User Login and JWT Generation

    Add a login route that, upon successful authentication, generates a JWT.

    // ... (previous code)
    
    // Login route to generate a JWT
    app.post('/login', (req, res) => {
      const { username, password } = req.body;
    
      // Authenticate user (in a real app, you'd check a database)
      const user = users.find(u => u.username === username && u.password === password);
    
      if (!user) {
        return res.status(401).json({ message: 'Invalid credentials' });
      }
    
      // Generate JWT
      const token = jwt.sign(
        { userId: user.id, username: user.username },
        JWT_SECRET,
        { expiresIn: '1h' } // Token expires in 1 hour
      );
    
      res.json({ token });
    });
    
    // ... (remaining code)

    6. Create JWT Verification Middleware

    This middleware will protect routes by verifying the incoming JWT.

    // ... (previous code)
    
    // Middleware to verify JWT
    function authenticateToken(req, res, next) {
      const authHeader = req.headers['authorization'];
      const token = authHeader && authHeader.split(' ')[1]; // Bearer TOKEN
    
      if (token == null) {
        return res.sendStatus(401).json({ message: 'No token provided' });
      }
    
      jwt.verify(token, JWT_SECRET, (err, user) => {
        if (err) {
          return res.sendStatus(403).json({ message: 'Invalid token' });
        }
        req.user = user; // Attach user payload to the request
        next();
      });
    }
    
    // ... (remaining code)

    7. Protect Routes with the Middleware

    Apply the authenticateToken middleware to any routes you want to secure.

    // ... (previous code)
    
    // Protected route example
    app.get('/protected', authenticateToken, (req, res) => {
      res.json({ message: `Welcome ${req.user.username}! This is a protected route.`, user: req.user });
    });
    
    // ... (remaining code)

    Testing Your JWT Authentication

    You can use tools like Postman or Insomnia to test your API:

    1. Login: Send a POST request to /login with username and password in the body. You should receive a JWT.
    2. Access Protected Route: Send a GET request to /protected. In the headers, include Authorization: Bearer YOUR_GENERATED_TOKEN.

    Security Best Practices for JWT in Node.js

    • Keep Your Secret Key Secure: Never hardcode it. Use environment variables.
    • Set Expiration Times: Use expiresIn to limit token validity, reducing the risk of compromised tokens.
    • Use HTTPS: Always transmit tokens over secure channels to prevent interception.
    • Refresh Tokens (for long sessions): For extended user sessions, implement refresh tokens to issue new access tokens without requiring re-authentication every time the short-lived access token expires.
    • Don’t Store Sensitive Data in Payload: JWT payloads are only encoded, not encrypted. Anyone with the token can read its contents.
    • Token Invalidation: While JWTs are stateless, you might need a mechanism (like a blacklist) for immediate invalidation in case of logout or compromise.

    Conclusion

    Implementing JWT authentication in your Node.js application provides a powerful, stateless way to manage user sessions and secure your API endpoints. By following the steps outlined in this guide and adhering to best practices, you can build robust and secure authentication systems.

    Based on the provided infographic titled “NODE.JS JWT AUTHENTICATION FLOW: Secure Your APIs with Express & Passport.js”, here is the detailed content breakdown:

    🔐 Node.js JWT Authentication Guide

    The infographic illustrates a secure, three-part system for managing user identity and access in a Node.js environment.

    1. User Login & Token Generation

    This stage covers the initial authentication process:

    • Client Login: A user submits their Username and Password via an HTTP POST /login request.
    • Express Route: The request is handled by an Express route using the Passport.js Local Strategy to verify the user.
    • JWT Creation: Once verified, the server generates a token using jwt.sign(id, SECRET).
    • Storage: The server returns an HTTP 200 Response + JWT, which the client then stores in Local Storage or a Cookie.

    2. Accessing Protected Routes

    This stage shows how the token is used for subsequent authorized requests:

    • Client Sends JWT: For an HTTP GET /api/data request, the client includes the token in the header as Authorization: Bearer <token>.
    • Passport-JWT Strategy: Middleware verifies the token by checking the signature and the expiration (exp).
    • Validation Check:
      • YES: Access is granted to the API endpoint logic.
      • NO: An HTTP 401 Unauthorized error is returned.

    3. JWT Structure & Security

    This section breaks down the technical components of a JSON Web Token:

    • Token Components:
      • Header: Contains metadata like the algorithm (alg) and token type (typ).
      • Payload: Stores claims such as the subject (sub), user name, and issued-at time (iat).
      • Signature: A hash created using the header, payload, and the secret key.
    • Security Essentials:
      • User DB: Payload data is used to fetch user details from the database.
      • SECRET_KEY: This must be stored in a .env file and must be both secure and long.

    KEY TAKEAWAY: JWTs enable Stateless, Scalable, and Secure API Authentication in Node.js.

    learn for more knowledge

    Json parser-> Fastest JSON Parser Python for Peak Performance: Why Orjson and Msgspec are the Top Contenders – json parse

    Mykeywordrank-> How to Use a Rank Checker Effectively to Boost Your SEO – keyword rank checker

    Json Compare ->How to Compare Two JSON Files Effectively: A Comprehensive Guide – online json comparator

    Fake Json –>How to Use Dummy API JSON for Faster Development and Testing: Leveraging Fake APIs, JSON, and Mockaroo

  • How to Implement jwt token node js Applications

    How to Implement JWT Authentication in Node.js Applications

    In today’s interconnected world, securing your APIs is paramount. JSON Web Tokens (JWT) provide a robust, stateless way to handle authentication and authorization in modern web applications. This comprehensive guide will walk you through the process of implementing JWT authentication in your Node.js and Express.js applications, ensuring your endpoints are secure and your data protected.

    What is JWT?

    JWT, or JSON Web Token, is an open standard (RFC 7519) that defines a compact and self-contained way for securely transmitting information between parties as a JSON object. It’s often used for authentication where a server generates a token that certifies a user’s identity and then sends it to the client. The client can then use this token to prove their identity to subsequent requests.

    A JWT consists of three parts, separated by dots:

    • Header: Contains the type of token (JWT) and the signing algorithm (e.g., HMAC SHA256 or RSA).
    • Payload: Contains the claims, which are statements about an entity (typically, the user) and additional data.
    • Signature: Used to verify that the sender of the JWT is who it says it is and to ensure that the message hasn’t been changed along the way.

    Prerequisites

    • Basic understanding of Node.js and Express.js.
    • Node.js and npm installed on your machine.
    • A code editor (e.g., VS Code).

    Step 1: Project Setup and Dependencies

    First, let’s create a new Node.js project and install the necessary packages:

    mkdir jwt-node-app
    cd jwt-node-app
    npm init -y
    npm install express jsonwebtoken dotenv bcryptjs
    • express: Our web framework.
    • jsonwebtoken: For creating and verifying JWTs.
    • dotenv: To manage environment variables securely.
    • bcryptjs: For hashing passwords (crucial for user registration/login).

    Step 2: Create Your Express Application

    Create an index.js file and set up a basic Express server:

    // index.js
    require('dotenv').config(); // Load environment variables
    const express = require('express');
    const app = express();
    const PORT = process.env.PORT || 3000;
    
    app.use(express.json()); // Enable JSON body parsing
    
    app.get('/', (req, res) => {
        res.send('Welcome to the JWT Node.js App!');
    });
    
    app.listen(PORT, () => {
        console.log(`Server running on port ${PORT}`);
    });

    Also, create a .env file in the root directory for your secret key:

    // .env
    JWT_SECRET=supersecretjwtkeythatshouldbemorecomplex

    Important: Always use a strong, randomly generated secret key in a production environment.

    Step 3: User Authentication and Token Generation

    Let’s simulate user registration and login. We’ll need a simple user array (in a real app, this would be a database) and a way to hash/compare passwords.

    // index.js (add these lines)
    const jwt = require('jsonwebtoken');
    const bcrypt = require('bcryptjs');
    
    // A simple in-memory user store (for demonstration purposes)
    const users = [];
    
    // Register Route
    app.post('/register', async (req, res) => {
        try {
            const { username, password } = req.body;
            if (users.find(u => u.username === username)) {
                return res.status(400).send('User already exists');
            }
            const hashedPassword = await bcrypt.hash(password, 10);
            const newUser = { id: Date.now(), username, password: hashedPassword };
            users.push(newUser);
            res.status(201).send('User registered successfully');
        } catch (error) {
            res.status(500).send('Error registering user');
        }
    });
    
    // Login Route
    app.post('/login', async (req, res) => {
        try {
            const { username, password } = req.body;
            const user = users.find(u => u.username === username);
            if (!user) {
                return res.status(400).send('Invalid credentials');
            }
    
            const isMatch = await bcrypt.compare(password, user.password);
            if (!isMatch) {
                return res.status(400).send('Invalid credentials');
            }
    
            // Generate JWT
            const token = jwt.sign(
                { id: user.id, username: user.username },
                process.env.JWT_SECRET,
                { expiresIn: '1h' } // Token expires in 1 hour
            );
    
            res.json({ token });
        } catch (error) {
            res.status(500).send('Error logging in');
        }
    });

    After a successful login, the server responds with a JWT. The client should store this token (e.g., in local storage or a cookie) and include it in the authorization header of subsequent requests.

    Step 4: Creating a JWT Verification Middleware

    To protect your routes, you’ll need a middleware function that verifies the incoming JWT.

    // authMiddleware.js (create a new file)
    const jwt = require('jsonwebtoken');
    
    function authenticateToken(req, res, next) {
        const authHeader = req.headers['authorization'];
        // Format: "Bearer TOKEN"
        const token = authHeader && authHeader.split(' ')[1];
    
        if (token == null) {
            return res.sendStatus(401); // No token provided
        }
    
        jwt.verify(token, process.env.JWT_SECRET, (err, user) => {
            if (err) {
                return res.sendStatus(403); // Token is invalid or expired
            }
            req.user = user; // Attach user payload to request
            next(); // Proceed to the next middleware/route handler
        });
    }
    
    module.exports = authenticateToken;

    Step 5: Protecting Routes with Middleware

    Now, let’s import and use our authenticateToken middleware to protect a sample route in index.js.

    // index.js (add these lines)
    const authenticateToken = require('./authMiddleware');
    
    // Protected Route
    app.get('/protected', authenticateToken, (req, res) => {
        res.json({ message: `Welcome ${req.user.username}! This is protected data.`, user: req.user });
    });

    Now, if you try to access /protected without a valid JWT in the Authorization header (Bearer <token>), you’ll receive a 401 or 403 status. With a valid token, you’ll get access to the data.

    Best Practices for JWT Security

    • Keep Your Secret Key Secure: Never hardcode it. Use environment variables (.env) and ensure it’s a long, complex, random string.
    • Set Expiration Times: Always include an expiresIn option when signing tokens to limit the window of opportunity for stolen tokens. Short-lived tokens are generally safer.
    • Use HTTPS: Always transmit tokens over secure HTTPS connections to prevent man-in-the-middle attacks.
    • Don’t Store Sensitive Data in Payload: JWTs are signed, not encrypted. Anyone can read the payload. Only store non-sensitive user IDs or roles.
    • Consider Refresh Tokens: For a better user experience with short-lived access tokens, implement a refresh token mechanism. Refresh tokens are long-lived, stored securely, and used only to request new access tokens.
    • Revocation: While JWTs are stateless, you might need a mechanism for blacklisting tokens (e.g., on logout or compromise) if you use longer-lived tokens or refresh tokens.

    Conclusion

    Implementing JWT authentication in Node.js provides a robust and scalable solution for securing your APIs. By following this guide, you’ve learned how to generate, sign, and verify JSON Web Tokens, along with essential security best practices. Now you can build secure, production-ready Node.js applications with confidence.

    Feel free to expand on this implementation by integrating a real database like MongoDB or PostgreSQL, and adding more sophisticated error handling and logging.

    The image is an infographic titled “JWT AUTHENTICATION FLOW IN NODE.JS: Express & Passport.js Guide”. It details the three main stages of implementing JSON Web Token (JWT) based authentication in a Node.js environment, specifically using Express and the Passport.js library.

    🔒 JWT Authentication Flow in Node.js

    1. Authentication Flow (Login)

    This section explains how a user initially logs in and receives a JWT:

    • Client Login: The user sends credentials to the server.
    • Express Route: The request hits the /api/login endpoint.
    • Passport.js Local Strategy: This component verifies the username and password.
    • JWT Generation: Upon successful verification, a JWT is created using jwt.sign(id, SECRET_KEY).
    • Client Receives JWT: The token is sent back to the client to be stored in local storage or a cookie.

    2. Authorization Flow (Subsequent Requests)

    This outlines how the client uses the JWT to access protected resources:

    • Client Sends JWT: The client includes the token in the request header: Authorization: Bearer <token>.
    • Express Middleware: The request is intercepted by Passport’s middleware (passport.authenticate("jwt", {session: false})).
    • Is Valid & Authorized?: The token is validated.
      • YES: Access is granted, and the request reaches the protected API endpoint (@PreAuthorize).

    3. Key Components & Secrets

    This section breaks down the JWT structure and security considerations:

    • Header.Payload.Signature: The structure is alg: HS256, typ: JWT (Header), user details (id, user_id), and timestamps (iat, exp) (Payload).
    • SECRET KEY: It is emphasized to Use a strong environment variable for the SECRETKEY.
    • User Store (DB): User details are fetched from the database using the payload ID after the token is verified.

    learn for more knowledge

    Json parser-> How to Find the Fastest JSON Parser for Peak Performance – json parse

    Mykeywordrank-> Search Page Optimization: Maximizing Visibility and Clicks on the SERP (A Key to Your Site’s Success) – keyword rank checker

    Json Compare ->Compare Two JSON Files Online Easily and Accurately – online json comparator

    Fake Json –>Dummy API for JSON Data: Unlocking Efficient Development – fake api

  • Spring Security JWT: Your Comprehensive Guide to JSON Web Tokens

    Introduction to Spring Security and JWT

    Securing modern web applications and APIs is paramount. Spring Security provides a robust security framework for authentication and authorization, while JSON Web Tokens (JWT tokens) offer a stateless, compact, and URL-safe way to represent claims between two parties. Combining these two technologies is a powerful approach for building secure RESTful services.

    This guide will walk you through the process of setting up Spring Security JWT for token-based authentication in a Spring Boot application.

    Why use JWT with Spring Security?

    • Stateless Authentication: JWT tokens eliminate the need for server-side sessions, making your application more scalable. This is the core difference from traditional Spring Security sessions.
    • Decoupling: The client sends the JWT with each request, and the server (resource server) validates it independently.
    • Microservices/OAuth Compatibility: JWT is the preferred method for implementing security oauth (OAuth 2.0), where an authorization server issues the access token (JWT) to be validated by a resource server.

    Step-by-Step Implementation

    Step 1: Project Setup and Dependencies

    You’ll need the core Spring Security, Spring Boot, and the jjwt dependency for handling JWT tokens.

    Step 2: Configure JWT Properties

    Add JWT-related properties to your application.properties or application.yml (secret key and token expiration time).

    Step 3: Create a JWT Utility Class (The JwtService)

    This class, which acts as your JwtService, will handle the generation and validation of JWTs. It is responsible for:

    • Generating the Token: Using a secret key and setting the subject (the user) and claims (such as roles).
    • Extracting Claims: Parsing the JWT to extract claims like the username and expiration date.
    • Validation: Checking if the token is valid and not expired against the provided userdetails.

    Step 4: Create a Custom UserDetailsService

    This service loads user-specific data (userdetails) for authentication. In a production scenario, this service would manage the roles and permissions from a database.

    Step 5: Implement a JWT Authentication Filter

    This crucial filter intercepts incoming requests to ensure every secured endpoint is checked. It performs the following steps:

    1. Extracts the JWT from the Authorization header (Bearer access token).
    2. Uses the JwtService (JwtUtil) to validate the token.
    3. If valid, it sets the authenticated user in the SecurityContextHolder, completing the jwt authentication flow.

    Step 6: Configure Spring Security (SecurityConfig)

    This is the central configuration of your security framework using Spring Security.

    • Stateless Policy: We configure the sessionManagement to be SessionCreationPolicy.STATELESS—the hallmark of Spring Security JWT implementation.
    • Authentication Manager: The AuthenticationManager is configured to handle the authentication process, relying on the DaoAuthenticationProvider and UserDetailsService.
    • Filter Integration: We inject the JwtRequestFilter before the standard UsernamePasswordAuthenticationFilter to prioritize token validation for API requests.
    • textJwtDecoder: While not explicitly used in this jjwt example, a JwtDecoder is the component used in more advanced security oauth 2.0 implementations (resource server configuration) to decode and validate access tokens from an external authorization server.

    Step 7: Create an Authentication Controller

    This controller handles the POST request to authenticate:

    1. It calls the AuthenticationManager to authenticate the user credentials (username/password).
    2. If successful, it uses the JwtService to generate a new JWT token.
    3. The JWT is returned to the client for use as an access token in future requests.

    Conclusion

    You have successfully implemented Spring Security JWT for stateless authentication in your Spring Boot application. This setup, leveraging a custom JwtService and JWT filter, provides a solid foundation for securing RESTful APIs and is compatible with modern security oauth architectures.

    Spring Security JWT Authentication Flow

    1. Authentication Flow (Initial Login)

    This outlines how a user gets a JWT after successfully logging in:

    • User Login: The client sends the username/password to the /auth/login endpoint.
    • AuthenticationManager: Spring Security verifies the user’s credentials.
    • JWT Generation: Upon successful authentication, a JWT is generated and signed with a secret key.
    • Client Receives JWT: The client receives the JWT (e.g., stored in Local Storage).

    2. The Authorization Flow (Subsequent Requests)

    This explains how the JWT is used for accessing protected resources:

    • Client Sends JWT: The client includes the Authorization: Bearer <token> header in requests to protected endpoints.
    • JWT Filter: The filter intercepts the request and extracts the JWT.
    • Validate & Parse JWT: The system verifies the signature and checks the token’s expiration, extracting user details like roles.
    • Is Valid & Authorized? A decision point checks if the token is both valid and the user is authorized.
      • YES: Access is granted, and the request reaches the @PreAuthorize endpoint.

    3. JWT Structure & Key Components

    A JWT is shown as three parts separated by dots, xxx.yyy.zzz, which are Base64 encoded.

    • Header (Blue): Contains the algorithm (alg: HS256) and token type (typ: JWT).
    • Payload (Green): Contains Claims (User Info, Roles) and extracts user details (e.g., timestamp).
    • Signature (Purple): Verified by a Secret Key using the formula: Header + Payload + Secret.

    learn for more knowledge

    Json parser-> Express JSON Parser: A Comprehensive Guide to express.json – json parse

    Mykeywordrank-> Search Engine Optimization What It Is and How to Do It Effectively – keyword rank checker

    Json Compare ->How to Compare Two JSON Objects: A Comprehensive Guide – online json comparator

    Fake Json –>How to Create Fake JSON API Online: Boost Your Development Workflow – fake api

  • How to Effectively Manage Auth0 Tokens for Secure Applications

    In the realm of modern application development, securing user authentication and authorization is paramount. Auth0 provides a robust platform for identity management, and at its core are Auth0 tokens. Understanding how to effectively obtain, validate, and utilize these tokens is crucial for building secure and scalable applications. This guide will walk you through the essentials of managing Auth0 tokens, helping you to boost your application’s security posture and user experience.

    What Are Auth0 Tokens?

    Auth0 tokens are standardized security tokens used to convey information about an authenticated user or grant authorization to access resources. They come primarily in three types, each serving a distinct purpose in the authentication and authorization flow facilitated by Auth0.

    Types of Auth0 Tokens

    • ID Token (JWT): This token contains profile information about the user, such as their name, email, and other attributes. It’s primarily used by the client application to know who the user is. ID tokens are JSON Web Tokens (JWTs) and are signed to ensure their integrity.
    • Access Token (JWT): Used to authorize access to protected resources (APIs). When a client application wants to call an API, it sends the access token, and the API validates it to determine if the client has the necessary permissions. Access tokens are also JWTs and typically have a shorter lifespan.
    • Refresh Token: A long-lived credential used to obtain new access tokens and ID tokens after the original ones expire, without requiring the user to log in again. Refresh tokens should be handled with extreme care due to their sensitive nature.

    How to Obtain Auth0 Tokens

    Obtaining tokens typically happens after a successful user authentication flow. Auth0 SDKs simplify this process for various platforms.

    Client-Side (SPA/Mobile) Example

    When using Auth0’s Single-Page Application (SPA) SDK, tokens are usually retrieved after a successful login redirect or silent authentication.

    
    // Example using Auth0 SPA SDK for JavaScript
    import { createAuth0Client } from '@auth0/auth0-spa-js';
    
    const auth0 = await createAuth0Client({
      domain: 'YOUR_AUTH0_DOMAIN',
      clientId: 'YOUR_AUTH0_CLIENT_ID',
      authorizationParams: {
        redirect_uri: window.location.origin
      }
    });
    
    await auth0.loginWithRedirect(); // User logs in
    
    // After redirect, check for login state and get tokens
    if (window.location.search.includes('code=')) {
      await auth0.handleRedirectCallback();
      const accessToken = await auth0.getTokenSilently();
      const idTokenClaims = await auth0.getIdTokenClaims();
      console.log('Access Token:', accessToken);
      console.log('ID Token Claims:', idTokenClaims);
    }
    

    Server-Side Applications

    For server-side applications, you might use an Authorization Code Grant flow, where an authorization code is exchanged for tokens at the token endpoint.

    
    // Pseudo-code for exchanging authorization code for tokens
    POST /oauth/token HTTP/1.1
    Host: YOUR_AUTH0_DOMAIN
    Content-Type: application/x-www-form-urlencoded
    
    grant_type=authorization_code&
    client_id=YOUR_AUTH0_CLIENT_ID&
    client_secret=YOUR_AUTH0_CLIENT_SECRET&
    code=YOUR_AUTHORIZATION_CODE&
    redirect_uri=YOUR_REDIRECT_URI
    

    How to Validate Auth0 Tokens

    Token validation is critical to ensure that tokens are legitimate, haven’t been tampered with, and are still valid.

    Validating ID Tokens (Client-Side)

    ID tokens can be validated on the client side to verify user identity. This involves checking the signature against Auth0’s public keys, verifying issuer, audience, and expiration claims. Auth0 SDKs handle this automatically.

    Validating Access Tokens (Server-Side)

    APIs must validate access tokens sent by client applications. This is typically done by:

    • Checking the token signature: Using Auth0’s JSON Web Key Set (JWKS) endpoint to retrieve public keys.
    • Verifying the issuer (iss claim): Ensuring the token came from your Auth0 tenant.
    • Verifying the audience (aud claim): Ensuring the token is intended for your API.
    • Checking expiration (exp claim): Ensuring the token has not expired.
    • Checking scopes (scope claim): Ensuring the token grants the necessary permissions.
    
    // Example: Simplified Node.js validation using jsonwebtoken and jwks-rsa
    const jwt = require('jsonwebtoken');
    const jwksClient = require('jwks-rsa');
    
    const client = jwksClient({
      jwksUri: `https://${process.env.AUTH0_DOMAIN}/.well-known/jwks.json`
    });
    
    function getKey(header, callback){
      client.getSigningKey(header.kid, function(err, key) {
        const signingKey = key.publicKey || key.rsaPublicKey;
        callback(null, signingKey);
      });
    }
    
    function validateAccessToken(token) {
      return new Promise((resolve, reject) => {
        jwt.verify(token, getKey, {
          audience: process.env.AUTH0_AUDIENCE,
          issuer: `https://${process.env.AUTH0_DOMAIN}/`,
          algorithms: ['RS256']
        }, (err, decoded) => {
          if (err) {
            return reject(err);
          }
          resolve(decoded);
        });
      });
    }
    
    // In your API endpoint:
    // try {
    //   const decodedToken = await validateAccessToken(req.headers.authorization.split(' ')[1]);
    //   // Token is valid, proceed with request
    // } catch (error) {
    //   // Token is invalid
    //   res.status(401).send('Unauthorized');
    // }
    

    Securely Using Auth0 Tokens

    Proper handling of tokens is paramount to prevent security vulnerabilities.

    • Store Tokens Securely:
      • For SPAs: Use in-memory storage or Web Workers (with caution). Avoid localStorage for access/refresh tokens due to XSS risks.
      • For server-side: Store refresh tokens encrypted in a secure database.
    • Transmit Tokens via HTTPS: Always send tokens over secure channels to prevent interception.
    • Send Access Tokens in Authorization Header: Typically as a Bearer token: Authorization: Bearer YOUR_ACCESS_TOKEN.
    • Handle Token Expiration and Renewal: Implement logic to gracefully renew access tokens using refresh tokens (or silent authentication for SPAs) before they expire.

    Best Practices for Auth0 Token Management

    • Keep Access Tokens Short-Lived: This minimizes the impact of a compromised token.
    • Use Refresh Tokens Strategically: Grant them only when necessary (e.g., for long-lived sessions) and revoke them if suspicious activity is detected.
    • Define Specific Audiences and Scopes: Ensure tokens are granted only for the resources and permissions they need.
    • Implement Token Revocation: Provide mechanisms to revoke refresh tokens and (less commonly) access tokens when a user logs out or if a token is compromised.
    • Log and Monitor Token Activity: Keep an eye on authentication and token issuance events for auditing and security analysis.

    Conclusion

    Auth0 tokens are fundamental to building secure and efficient identity solutions. By understanding their types, mastering the methods for obtaining and validating them, and adhering to best practices for secure usage, you can significantly enhance the security and reliability of your applications. Always prioritize security in your token management strategy to protect both your users and your resources.

    Auth0 Token Authentication Flow

    The top section illustrates the sequence of actions that occur during the authentication process:

    1. User Authentication: A User interacts with the User Application which involves Auth0.
    2. Client Application: The flow moves to the Client Application.
    3. Client Login Page: The user is directed to the Client/Auth0 Login Page where credentials are provided.
    4. Client Application (Token Received): The authenticated user returns to the Client Application with the tokens.
    5. SPA (Single Page Application): The client application uses the tokens to access the secure SPA.

    🔑 Token Structure (ID Token)

    The graphic details the structure of a standard JSON Web Token (JWT), which is used for the ID Token and Access Token (represented as XXXXX.yyy.ZZZ).

    • Header (Blue): Contains metadata like the algorithm used (alg).
    • Payload (Green): Contains user information and claims.
      • Claims: Includes sub (subject), name, email, exp (expiration time), and scope.
    • Access Token (Red): This is a separate token, also a JWT, containing specific claims for API access.
      • Claims: Includes aut idenlifiie (client ID), sub, scope (permissions like read:products), and audience (aud).

    📄 Token Purpose and Usage (Comparison Table)

    The bottom table summarizes the key differences between the three token types:

    FeatureID Token (JWT)Access Token (JWT)Refresh Token
    PurposeUsed for Toekn (authentication/verification of the user’s identity).Bearer/toked (authorization to access protected API resources).Used to get a new Access Token without re-logging in.
    Used ByShort-livel (hours).Short-livel (hours).Long-livel (years).
    Refresh TokenBase64 + Private Key (used to secure the token).Base64 + Private Key.An Opace string, stored as an HTTP-only cookie.

    learn for more knowledge

    Json parser-> How to express json body parser- A Complete Guide – json parse

    Mykeywordrank-> Search Optimization SEO: Master Search Engine Optimization for Top Rankings – keyword rank checker

    Json Compare ->Compare JSON File Online: Your Essential JSON Diff and Format Guide – online json comparator

    Fake Json –>How to Create Fake JSON API for Faster Development and Testing – fake api

  • How to Use token jwt (JSON Web Tokens) for Secure Authentication

    JSON Web Tokens (JWT) have become a cornerstone in modern web application security, providing a compact, URL-safe means of representing claims between two parties. If you’re looking to understand and implement secure authentication, mastering “How to use JWT” is essential. This guide will walk you through the fundamentals, implementation, and best practices for leveraging JWTs effectively.

    What is JWT (JSON Web Token)?

    A JWT is an open standard (RFC 7519) that defines a compact and self-contained way for securely transmitting information between parties as a JSON object. This information can be verified and trusted because it is digitally signed. JWTs are commonly used for authorization, where a server can verify a user’s identity based on the token.

    JWT Structure: Header, Payload, and Signature

    Every JWT consists of three parts, separated by dots (.), which are Base64Url-encoded:

    • Header: Typically consists of two parts: the type of the token, which is JWT, and the signing algorithm being used, such as HMAC SHA256 or RSA.
      {
      "alg": "HS256",
      "typ": "JWT"
      }

    • Payload: Contains the claims. Claims are statements about an entity (typically, the user) and additional data. There are three types of claims: registered, public, and private claims.
      {
      "sub": "1234567890",
      "name": "John Doe",
      "iat": 1516239022
      }

    • Signature: To create the signature part, you take the encoded header, the encoded payload, a secret, the algorithm specified in the header, and sign that. The signature is used to verify that the sender of the JWT is who it says it is and to ensure that the message hasn’t been tampered with.
      HMACSHA256(
      base64UrlEncode(header) + "." +
      base64UrlEncode(payload),
      secret
      )

    The resulting JWT looks like this:

    eyJhbGciOiJIUzI1NiIsInR5cCI6IkpXVCJ9.eyJzdWIiOiIxMjM0NTY3ODkwIiwibmFtZSI6IkpvaG4gRG9lIiwiaWF0IjoxNTE2MjM5MDIyfQ.SflKxwRJSMeKKF2QT4fwpMeJf36POk6yJV_adQssw5c

    Why Use JWT for Authentication?

    JWTs offer several compelling advantages for authentication and authorization:

    • Statelessness: With JWTs, the server doesn’t need to store session information. Each request contains the necessary authentication data, making it ideal for scalable, distributed systems and microservices.
    • Compact: JWTs are small in size, allowing them to be sent through URL, POST parameter, or inside an HTTP header. This also means faster transmission.
    • Self-contained: The payload contains all the necessary user information, reducing the need for database lookups on every request, thereby improving performance.
    • Security: Signed JWTs ensure that the claims cannot be altered after the token has been issued, providing a robust security mechanism against tampering.

    How to Implement JWT: A Step-by-Step Overview

    Implementing JWT involves a few key steps:

    1. User Authentication and Token Generation

    When a user successfully logs in (e.g., provides correct username/password), your server generates a JWT. This involves:

    • Creating a header (algorithm, type).
    • Creating a payload (user ID, roles, expiry time, etc.).
    • Signing the header and payload with a secret key to produce the signature.

    The server then sends this JWT back to the client.

    2. Client-Side Storage and Transmission

    The client (e.g., a web browser or mobile app) receives the JWT and typically stores it in local storage, session storage, or as an HTTP-only cookie. For subsequent requests to protected routes, the client includes the JWT, usually in the Authorization header as a Bearer token.

    Authorization: Bearer <your_jwt_token>

    3. Server-Side Token Verification

    Upon receiving a request with a JWT, the server performs the following:

    • Decodes the header and payload.
    • Verifies the signature using the same secret key used for signing. If the signature is invalid, the token has been tampered with or is from an unauthorized source.
    • Checks the token’s claims, such as expiration time (exp) and issuer (iss).

    If all checks pass, the server trusts the token and grants access to the requested resource based on the claims.

    JWT Best Practices for Enhanced Security

    • Keep Your Secret Key Secure: Never expose your secret key. It’s crucial for signing and verifying tokens.
    • Set Expiration Times (exp claim): Tokens should have short expiration times to limit the window of opportunity for attackers if a token is compromised.
    • Implement Token Revocation: While JWTs are stateless, you might need mechanisms to revoke tokens prematurely (e.g., on logout or password change) using a blacklist.
    • Use HTTPS: Always transmit JWTs over HTTPS to prevent eavesdropping and Man-in-the-Middle attacks.
    • Avoid Storing Sensitive Data in Payload: The payload is encoded, not encrypted. Do not put highly sensitive, confidential information directly into the payload.
    • Use Strong Signing Algorithms: Prefer algorithms like HS256 (HMAC with SHA-256) or RS256 (RSA with SHA-256).

    Conclusion

    JWTs provide a powerful and flexible solution for secure, stateless authentication in modern applications. By understanding their structure, how they work, and implementing best practices, you can significantly enhance the security and scalability of your web services. Embrace JWTs to build robust and efficient authentication systems.

    The image is an infographic titled “INFOGRAPHICS: The token fore retertle praistens on tous toestmatics actructure be ruto denestons”. It is a highly technical visualization that breaks down the JSON Web Token (JWT) structure, its use in protected routes, and its comparison to traditional server-side sessions.

    🧱 The Structure of a JWT

    The top section illustrates the three distinct parts of a JWT:

    1. Header (Blue): Contains metadata about the token.
      • Example: "alg": "HS256", "typ": "JWT", isp: "167269200".
      • Security: This section is Server Signed with a secret key.
    2. Payload (Green): Contains the claims (user data and metadata).
      • Example: "sub": "User128", name: "John Doe", exp: "167269200".
      • Note: This data is base64 encoded, not encrypted, meaning it is readable by the client.
    3. Signature (Red): Used by the server to verify the token’s integrity.
      • Security: This section is Signed with a secret key.
      • Verification: If the signature does not match, the token is rejected as tampered with.
      • Combined Format: The final JWT is the concatenation of these three parts: Header.Payload.Signature (e.g., XXXXX.XXXX.ZZZZ).

    🛡️ JWTs vs. Sessions (Server-Side Sessions)

    A diagram compares the JWT approach to traditional session management:

    • JWT Security: Based on the Digital Signature.
    • Session Security: Based on the Store Token (lookup in a server-side storage like a database or Redis).
    • A pie chart implies that JWTs offer a high level of security and scalability due to being stateless, while sessions require constant server interaction.

    🔒 JWT Protected Route Flow

    This section shows how the token is used to access secure API endpoints:

    • Logius Fisken (Protected Route): Access requires a valid token.
    • Logir Token: If the token is valid, access is granted.

    ⏳ Expiration & Revocation

    This section addresses two key security challenges with JWTs:

    • Expiration: Uses short-lived Access Tokens and longer-lived Refresh Tokens to manage session duration.
    • Noroviriatie (Revocation): Involves using a mechanism like a Blacklist or Refresh Tokens (managed by a store like Redis) to instantly invalidate tokens before they naturally expire.

    learn for more knowledge

    Json parser -> BeautifulSoup JSON Parser-Combining BeautifulSoup and JSON for Web Scraping – json parse

    Mykeywordrank-> SEO: Your Comprehensive Guide to Boosting Search Engine Optimization Rankings – keyword rank checker

    Json Compare ->JSON Comparator: The Ultimate Guide to JSON Compare Online and Offline Tools – online json comparator

    Fake Json –>What Is JSON Mock API? (Beginner-Friendly Explanation) – fake api