Introduction to JWT and the Need for Centralized Management
JSON Web Tokens (JWTs) have become a popular choice for building stateless authentication systems. They are compact, URL-safe, and self-contained, allowing information to be securely transmitted between parties. The stateless nature means that once a client receives a token, it can access protected resources without requiring the server to store any session information. This simplicity greatly benefits scalable, distributed architectures like microservices.
However, the statelessness of JWTs presents a challenge: how do you revoke, invalidate, or blacklist a token before its natural expiration? Standard JWTs do not inherently support immediate revocation, making logout, password changes, or token compromise difficult to manage effectively. This is where a fast, external data store becomes essential.
This guide will explore how Redis, an incredibly fast in-memory data store, can be effectively utilized to manage JWT states, enabling features like immediate token blacklisting, whitelisting, and robust session management to enhance your application’s security and control.
Why Redis is Perfect for JWT Management
Redis stands out as an ideal solution for managing JWT states due to several key characteristics:
- Blazing Fast Performance: Being an in-memory data store, Redis offers incredibly low latency reads and writes, crucial for authentication checks that happen on every protected request.
- Versatile Data Structures: Redis supports various data types, including Strings, Sets, Hashes, and Sorted Sets, which are perfect for different token management strategies (e.g., storing a single token ID, managing a collection of blacklisted tokens, or mapping user IDs to active sessions).
- Built-in Expiration (TTL): Redis allows you to set a Time-To-Live (TTL) for any key, which is invaluable for automatically expiring blacklisted or whitelisted tokens in sync with their JWT expiry, reducing manual cleanup and memory footprint.
- Atomicity: Redis operations are atomic, ensuring data consistency when dealing with concurrent requests, which is vital in high-traffic authentication systems.
How to Implement JWT Blacklisting with Redis
Blacklisting is a common strategy where invalid tokens are explicitly marked and stored. When a user logs out or a token is compromised, its ID is added to a blacklist in Redis.
Storing Blacklisted Tokens
Upon a logout event or token revocation, extract the unique identifier (jti claim) from the JWT. Store this jti in Redis with an expiration time that matches or exceeds the original JWT’s expiration.
SET blacklist:jti:{TOKEN_ID} 1 EX {JWT_EXPIRATION_SECONDS}Here, {TOKEN_ID} is the jti claim value, and {JWT_EXPIRATION_SECONDS} is the remaining time until the token naturally expires.
Checking for Blacklisted Tokens
For every incoming request with a JWT, after decoding and verifying its signature, extract the jti. Before granting access, query Redis to check if this jti exists in the blacklist.
GET blacklist:jti:{TOKEN_ID}If Redis returns a value (e.g., 1), the token is blacklisted and should be rejected. If no value is found (nil), the token is considered valid (assuming other validations pass).
Implementing JWT Whitelisting (Session Management) with Redis
An alternative to blacklisting is whitelisting, where only explicitly approved tokens are stored in Redis. This approach can be more robust for certain scenarios, especially when you need to revoke all sessions for a user (e.g., after a password change).
Storing Whitelisted Tokens
When a user successfully logs in and receives a JWT, store its jti (or a session ID) in Redis, associated with the user’s ID. This acts as an active session indicator.
SET whitelist:user:{USER_ID}:jti:{TOKEN_ID} 1 EX {JWT_EXPIRATION_SECONDS}This approach allows you to quickly query for active sessions belonging to a specific user.
Revoking Whitelisted Tokens (Logout/All Sessions)
To log out a specific session, simply delete its corresponding key from Redis:
DEL whitelist:user:{USER_ID}:jti:{TOKEN_ID}To revoke all active tokens for a user (e.g., if their password is changed), you can delete all keys matching a pattern:
DEL whitelist:user:{USER_ID}:jti:*Note: The DEL command with a pattern requires careful implementation in production, often involving SCAN and then DEL in batches to avoid blocking Redis.
Managing Refresh Tokens with Redis
Refresh tokens are typically long-lived and used to obtain new access tokens when the old ones expire. Redis is excellent for managing these as well.
- Store Refresh Tokens: When a user logs in, issue a refresh token and store it in Redis, mapped to the user ID. Set an appropriate, longer expiration time.
SET refresh_token:{REFRESH_TOKEN_ID} {USER_ID} EX {REFRESH_TOKEN_EXPIRATION_SECONDS}- Validate and Rotate: When a client presents a refresh token, check its existence in Redis. If valid, issue a new access token and a new refresh token. Crucially, invalidate the old refresh token by deleting it from Redis to prevent replay attacks and enhance security.
DEL refresh_token:{OLD_REFRESH_TOKEN_ID}Best Practices for Redis JWT Integration
- Use
jtiClaim: Always include a uniquejti(JWT ID) claim in your tokens. This is crucial for identifying specific tokens for blacklisting or whitelisting. - Match Expiration Times: Set the Redis key’s TTL to align with the JWT’s expiration time. This ensures automatic cleanup and prevents stale entries.
- Consider Redis Persistence: For critical applications, configure Redis persistence (e.g., RDB snapshots or AOF logging) to avoid losing your token state in case of a Redis server restart.
- Secure Your Redis Instance: Ensure your Redis server is properly secured with authentication, network isolation, and TLS encryption, as it holds critical session data.
- Blacklisting vs. Whitelisting: Choose the strategy that best fits your application’s security requirements. Whitelisting offers more control for revoking all sessions for a user, while blacklisting is simpler for individual token invalidation.
- Error Handling: Implement robust error handling for all Redis operations to gracefully manage connection issues or other failures.
Conclusion
Integrating Redis with JWT authentication provides a powerful solution to overcome the inherent statelessness challenges of JSON Web Tokens. By leveraging Redis’s speed, versatile data structures, and built-in expiration capabilities, you can implement robust blacklisting, whitelisting, and refresh token management. This significantly enhances the security, control, and performance of your authentication system, allowing you to build scalable and resilient applications with confidence.
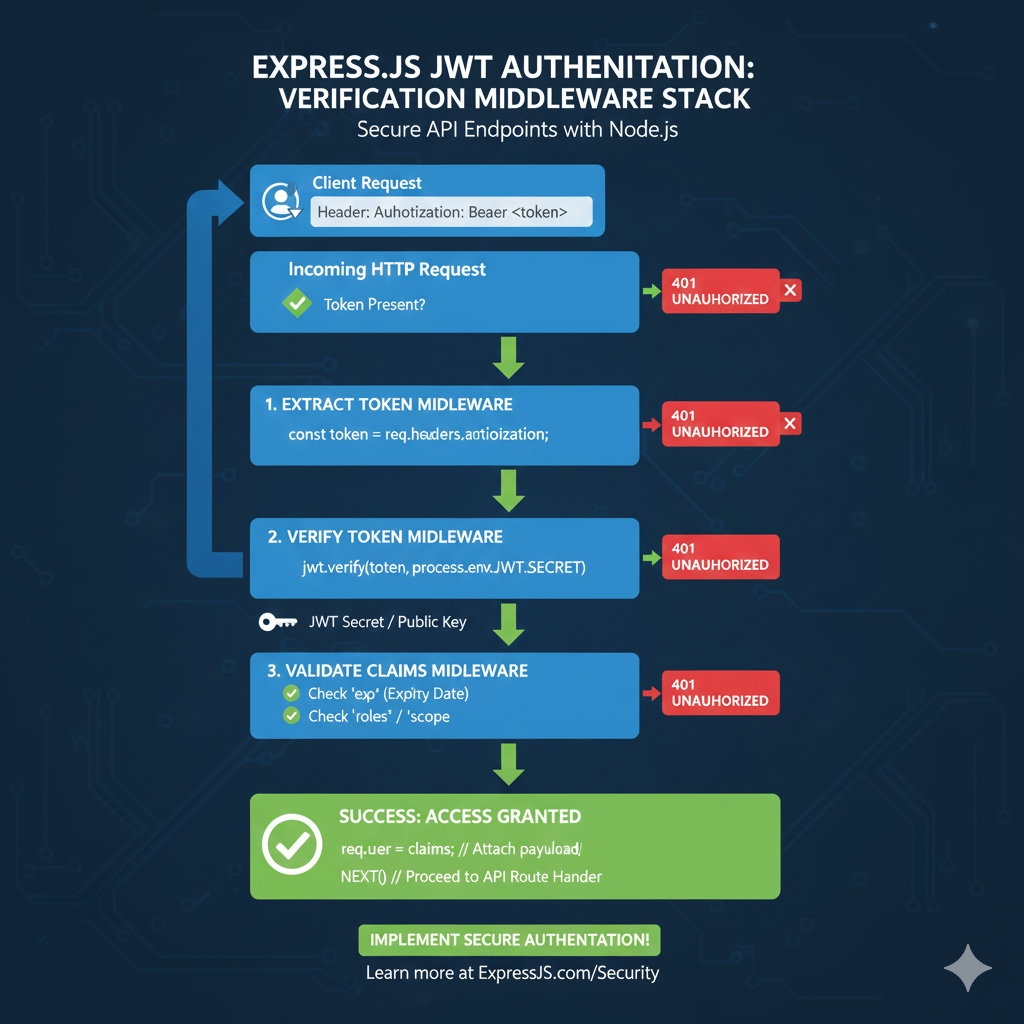
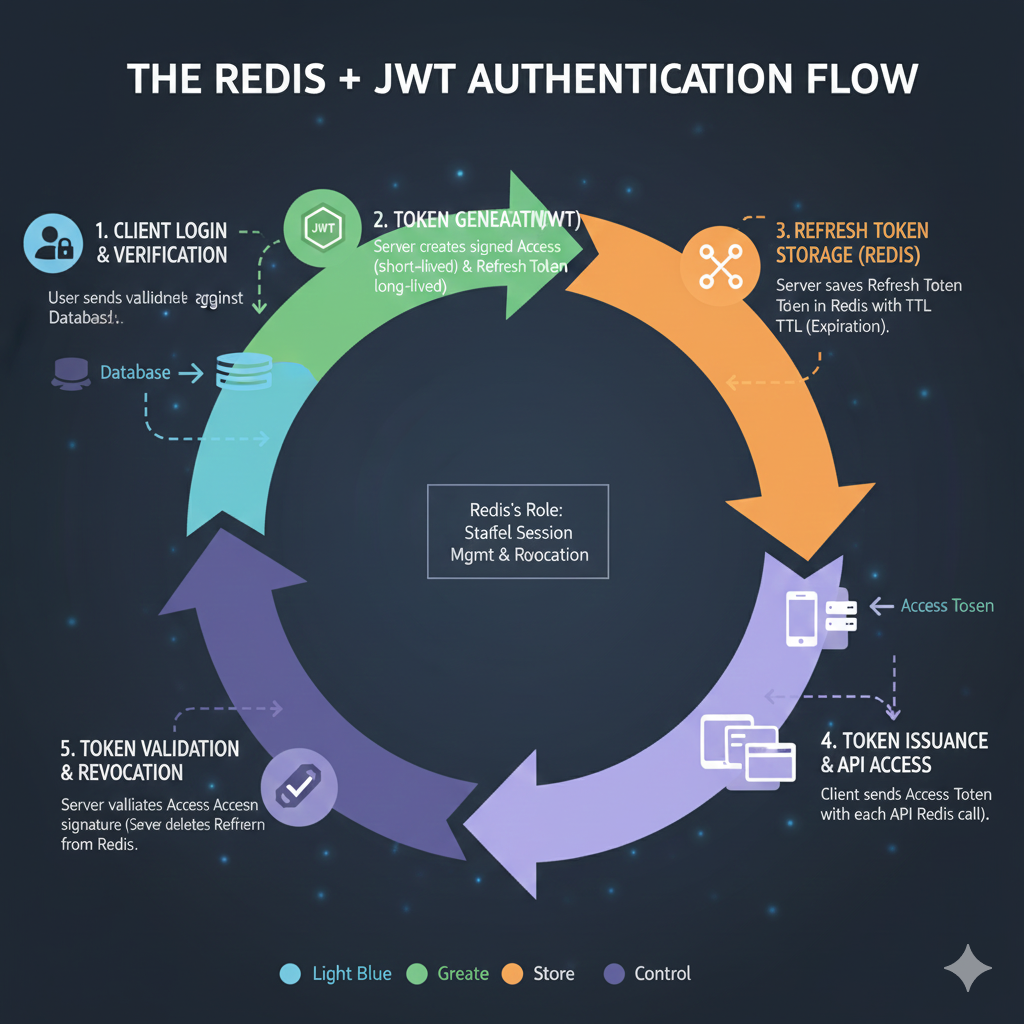
The Redis + JWT Authentication Flow
The infographic outlines a five-step, color-coded process, with the central role of Redis being to provide stateful session management and revocation.
1. 🔑 Client Login & Verification (Light Blue: Discovery)
- The user sends credentials, which the server validates against the persistent database.
2. 🛡️ Token Generation (Green: Create)
- The server creates a signed Access Token (short-lived) and a Refresh Token (long-lived).
3. 💾 Refresh Token Storage (Redis) (Orange: Store)
- The server saves the Refresh Token in Redis with a TTL (Time To Live/Expiration).
- Redis’s Role: Staffed Session Management & Revocation.
4. 📤 Token Issuance & API Access (Purple: Control)
- The client receives and sends the Access Token with each API Redis call.
5. ✅ Token Validation & Revocation (Purple: Control)
- The server validates the Access Token signature.
- The server validates the Refresh Token from Redis (used when the Access Token expires or upon explicit logout/revocation).
learn for more knowledge
Json Parser ->BeautifulSoup JSON Parser-Combining BeautifulSoup and JSON for Web Scraping – json parse
Mykeywordrank ->Search for SEO: The Ultimate Guide to Keyword Research and SEO Site Checkup – keyword rank checker
Json Compare ->Diff JSON Online- The Ultimate Guide to Comparing JSON Files for Developers – online json comparator
Fake Json –>What Is JSON Fake API? (Beginner-Friendly Explanation) – fake api